


Quick Summary
A successful undermount sink installation in granite starts with a dry fit and a stone-safe silicone. Mount the sink with mechanical clips or a rail, since silicone only seals and cannot carry the sink's weight. Allow a full day for the silicone to cure before using the sink.
- Make the sink about 3 inches narrower than the cabinet width.
- Dry fit the sink upside down and mark the clip locations before adding any adhesive.
- Choose a neutral cure silicone rated for stone to avoid staining porous granite.
- Silicone seals the sink but does not hold its weight, so clips or rails must carry the load.
- Tighten clips gradually, working around the sink, and avoid overtightening granite edges.
Table of Contents
- What You Need Before You Start Installing an Undermount Sink in Granite
- Step 1: Dry Fit the Sink and Mark the Mounting Clip Locations
- Step 2: Choose the Best Silicone for Undermount Sink Bonding
- Step 3: Set Up an Undermount Sink Support System While It Cures
- Step 4: Know How Long Silicone Takes to Cure on an Undermount Sink
- Step 5: Reconnect the Drain, Faucet and Water Supply
- Common Mistakes and Mistakes to Avoid When Installing Undermount Sinks in Granite
- Booking Your SinkElle Undermount Sink Accessories
- Frequently Asked Questions
What You Need Before You Start Installing an Undermount Sink in Granite
Last Updated: October 29, 2026
Installing an undermount sink in granite is a job that rewards preparation. A clean cut, a level sink and a tight seal depend on getting the small details right before the first clip goes on.
Start by confirming that the sink fits the opening. The Granite Guy team notes that the sink width should be about 3 inches narrower than the cabinet width, which leaves room for mounting hardware and the cabinet walls Granite Guy undermount sink sizing guide.
What to gather:
- The sink and its included mounting clips or rails
- A sink template or the manufacturer's cutout diagram
- Silicone sealant made for stone (a neutral cure type is the usual choice)
- A caulk gun, painter's tape and a clean rag
- Denatured alcohol for wiping the stone
- A drill with masonry bits if your clips require holes
- A wrench, plumber's putty and a level
Check the drain side too. Deep sinks need enough cabinet height to give the drain line a proper slope. If the drain sits too low, you may end up with a plumbing problem that no amount of sealant can fix.
Watch out: Silicone is meant to seal, not to hold the sink's weight. Relying on it alone can allow sinks to pull away from the countertop over time.
Plan your timing as well. Silicone needs hours to cure, so set aside a full day and avoid using the sink until the bond is set.
Step 1: Dry Fit the Sink and Mark the Mounting Clip Locations
Dry fitting is a step many people skip, and it can save a lot of trouble. Place the sink upside down on the countertop without any adhesive. Center it over the cutout and check the reveal, the gap between the sink rim and the stone edge.
Trace the outline with painter's tape or a pencil. Then mark where each mounting clip will sit. Clip locations depend on the sink design, so follow the manufacturer's spacing. Ruvati recommends this same dry fit approach before any adhesive goes down Ruvati undermount sink installation guide.
Check the level as you go. Use a level across the rim in both directions. A sink that sits even by a few millimeters will show it every time you wipe the counter.
Mark the clip spots on the underside of the granite and on the sink, so they line up later. Once you are happy with the layout, remove the sink and set it aside.
Step 2: Choose the Best Silicone for Undermount Sink Bonding
The silicone you pick matters more than most people expect, and on granite it is the difference between a clean install and a permanent stain ring around the sink. Granite is porous.
Why acid-cure is a poor choice here. Acid-cure silicones release acetic acid as they cure, which is the vinegar smell. On natural stone, the acid can etch or discolor the surface.
Why standard bathroom silicone may be risky. Some general-purpose bathroom sealants contain additives that can migrate into porous stone and leave a discoloration at the rim.
What to look for on the label:
- Neutral cure, no acid byproduct, gentler on stone.
- Stone-safe or natural-stone rated, formulated not to stain porous surfaces.
- Mildew resistant, the area under the sink stays damp.
- A stated cure time and a service-temperature range, read the data sheet, not just the tube.
Apply a thin, even bead. Run a continuous bead around the sink's rim on the underside, close to the outer edge.
Keep the stone clean before bonding. Wipe the granite underside and the sink rim with denatured alcohol and let them dry. Dust and oil are the usual reasons a bead fails to adhere.
The silicone you choose decides whether granite stays clean around the sink, so compare the key options below.
| Silicone type | Why it matters on granite | Key check |
|---|---|---|
| Acid-cure | Releases acetic acid that can etch or discolor stone | Avoid on natural stone |
| Standard bathroom silicone | Some additives can migrate into porous stone | Check for stone-safe rating |
| Neutral cure, stone-safe | No acid byproduct and gentler on stone | Look for stone-safe or natural-stone rating |
| Mildew resistant | Area under the sink stays damp | Confirm on the label |
Step 3: Set Up an Undermount Sink Support System While It Cures
This is where the support system does its real work. While the silicone cures, the sink needs to stay put, but the support system is not just a temporary holder. On granite, it is the primary load-bearing element for the life of the sink.
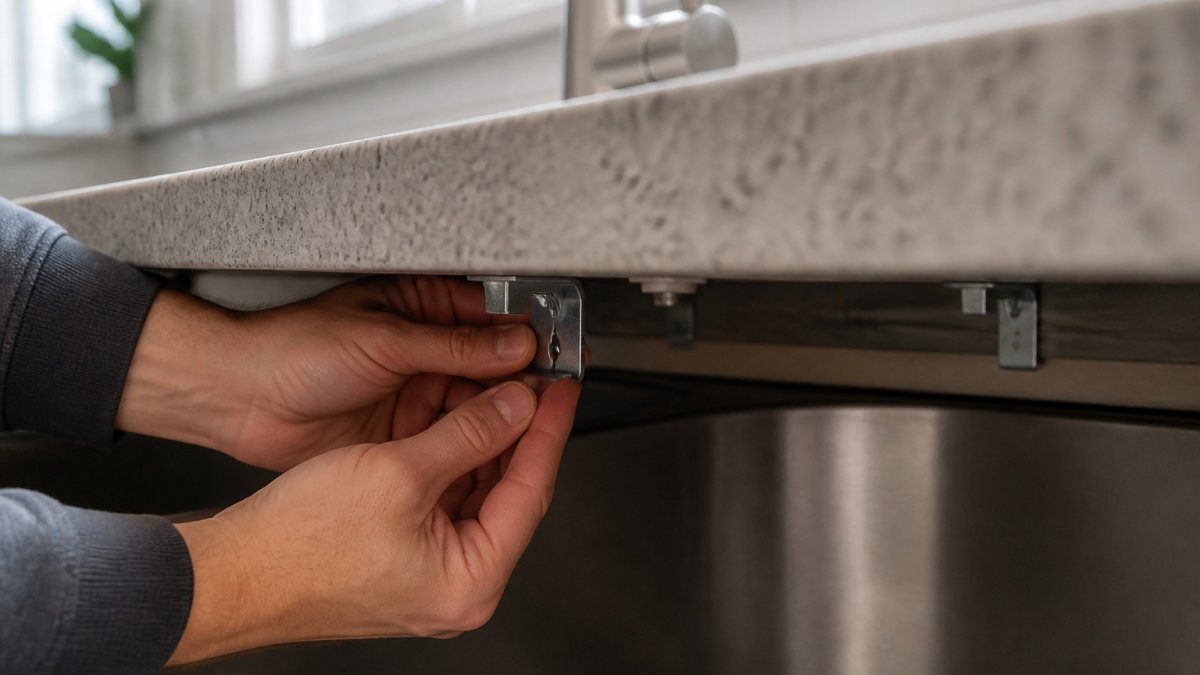
Understand the load path first. An undermount sink transfers its weight, plus the weight of water, dishes and a full basin, into the granite through two paths: the mounting clips or rails bearing on the underside of the stone, and the adhesive bond at the rim. The clips carry the vertical load; the silicone mainly keeps water out. Relying on the bond alone can allow a sink to pull away over time, especially with heavier models.
Match the support type to the sink and the stone edge.
- Mechanical clips (most common): These bolt to the underside of the granite and clamp the sink rim upward. They require a granite edge thick enough to hold the fastener without blowing out the stone. Thin granite edges generally call for a different support approach.
- Sink rails or a mounting frame: A continuous rail spreads the load along the entire rim instead of at discrete points. This is the better choice for heavy composite, cast iron or fireclay sinks, and for granite with a narrow or fragile edge.
- Epoxy and stud systems: Some installers set threaded studs into the granite underside with a structural epoxy rated for stone, then bolt the sink through those studs. This avoids drilling near the edge and distributes stress. Follow the product's instructions for any epoxy used, including its cure schedule, before hanging the sink.
- Sink setter tools: A temporary setter holds the sink tight to the stone while the silicone cures, then comes out. It supplements, never replaces, permanent clips or rails.
Install the clips in the right order. Use the markings from your dry fit. Hand-tighten each clip a little at a time, working around the sink in sequence rather than cranking one clip down fully.
Do not overtighten. Granite is strong in compression but brittle at a thin edge. A clip tightened past the manufacturer's spec can chip or crack the stone.
Wipe excess silicone immediately. Use a damp rag or denatured alcohol per the product directions. Do not disturb the sink until the cure time is complete.
Step 4: Know How Long Silicone Takes to Cure on an Undermount Sink
Cure time depends on the product, the thickness of the bead and the humidity in the room. Neutral cure silicones need several hours to set to the touch, and a longer period before they reach full strength.
Read the manufacturer's data sheet for the exact cure time. As a general rule, allow at least 24 hours before putting heavy loads in the sink or running water through the drain for heavy use. Plan extra time in cool or humid conditions.
Resist the urge to test early. Pulling on the sink before the bond sets can break the seal and force you to start over.
Step 5: Reconnect the Drain, Faucet and Water Supply
Once the sink has cured, reconnect the plumbing. Install the drain assembly with plumber's putty or a gasket as the manufacturer directs. Attach the tailpiece and connect it to the P-trap, making sure the slope drains freely. If you use a caddy under the sink, you can compare drainage solutions for kitchen sink caddies before you finish the layout.
Reconnect the faucet and water supply lines. Tighten fittings by hand first, then give them a gentle turn with a wrench. Open the shut-off valves slowly and check every joint for drips.
Run water for several minutes and watch the underside of the sink. A dry seal and clear drain are the signs of a successful install.
For keeping the drain area working well after installation, see How to Prevent Kitchen Sink Drain Clogs.
Common Mistakes and Mistakes to Avoid When Installing Undermount Sinks in Granite
Most failed installs trace back to a few predictable errors:
- Skipping the dry fit and cutting or drilling without checking the layout
- Using silicone as the only support
- Choosing a sealant that stains or is not rated for stone
- Overtightening clips, which can crack the granite
- Rushing the cure and loading the sink too soon
- Leaving silicone smears that dry visibly on the stone
Avoid these and the installation usually goes smoothly.
Booking Your SinkElle Undermount Sink Accessories
Once the sink is in, many homeowners want to organize the area around it. Once the install is done, many homeowners want to keep the sink zone tidy. You can browse the Sinkelle Flowcart Storage Rack to see the current options.
If water spatter is a concern near a new faucet, you can look at the Sinkelle AquaShield Faucet Guard. For caddies that stay put on granite, read our guide to non-slip sink caddies for granite.
Frequently Asked Questions
Do you need clips to install an undermount sink in granite?
Clips or rails are strongly recommended. Silicone alone bonds the sink to the stone but does not carry the sink's weight over time, and sinks can pull away from countertops when they are supported by adhesive alone. Mechanical clips, rails or a sink setter tool hold the bowl in place while the adhesive cures and keep it supported for years. Check your sink manufacturer's instructions, since some specify the exact clip system.
How long does silicone take to cure under an undermount sink?
Neutral-cure silicone sealants cure over a period that depends on bead thickness, humidity and temperature. Keep the sink supported and avoid loading the bowl with water or heavy dishes until the sealant has fully cured. Read the label on your specific product, because cure times vary by brand.
Can I install an undermount sink myself or should I hire a pro?
A confident DIYer with basic tools can install an undermount sink in granite, but the work demands precision. The sink template, drilling and clip placement all affect the final fit, and granite cracks if pressure is applied unevenly. If you are unsure about the countertop cutout or plumbing connections, a professional installer is worth the cost. For a quote, you can contact SinkElle through our website; pricing depends on the job and location.
What is the difference between a reveal and a flush mount for granite sinks?
A reveal is the visible gap between the sink rim and the countertop edge. A positive reveal leaves the sink slightly below the stone surface, while a negative reveal lets the stone overhang the sink rim. A flush mount sits level with the countertop. Your choice affects how easily the sink is cleaned and how the stone edge looks, so decide before cutting the opening.
