


Last Updated: October 24, 2026
Quick Summary
A temporary kitchen backsplash is a self-adhesive tile or removable panel product that refreshes your rental kitchen without damaging walls or risking your security deposit. Peel-and-stick vinyl tiles cost roughly $2-$5 per square foot and remove cleanly with heat, making them the most popular renter-friendly option for smooth painted drywall.
- Peel-and-stick vinyl tiles cost approximately $2.42 per square foot at The Home Depot and typically last 3-5 years.
- Heat the adhesive with a hair dryer on low for 30-60 seconds before peeling to remove tiles without wall damage.
- Clean and dry your wall completely before installation; adhesive fails on textured drywall, greasy surfaces, and wallpaper.
- Get written landlord approval before installing; most landlords approve because removable tiles cause zero permanent damage.
- Individual tiles are typically 6x6, 12x12, or 3x6 inches and cut easily with a utility knife around outlets and obstacles.
Table of Contents
- Why Renters Need a Temporary Kitchen Backsplash Solution
- Peel and Stick Backsplash for Renters: The Damage-Free Option
- Removable Backsplash Ideas That Work Around Tight Spaces
- Performance Factors: Heat, Moisture, and Durability
- How to Remove Peel and Stick Backsplash Without Wall Damage
- Landlord Approval and Lease Protection
- Planning Your Temporary Backsplash Project
- Frequently Asked Questions
Why Renters Need a Temporary Kitchen Backsplash Solution
A temporary kitchen backsplash transforms your rental kitchen without risking your security deposit.
Permanent backsplashes require adhesive that damages drywall, grout that stains, or drilling that creates holes you'll need to patch. A temporary solution refreshes your kitchen without that risk.
Today's removable options look polished and professional, modern peel-and-stick backsplashes mimic real marble, subway tile, and geometric patterns without permanent commitment.
Peel and Stick Backsplash for Renters: The Damage-Free Option
A peel and stick backsplash is a self-adhesive tile or panel product designed to release without tearing paint or drywall. It covers several materials with very different performance, price, and removal profiles, choosing the right one matters more than the pattern.
According to The Home Depot's 2026 product data, peel and stick marble vinyl tile backsplash costs approximately $2.42 per square foot, making it an affordable upgrade for most rental kitchens.
The four renter-friendly backsplash materials, compared
- Peel-and-stick vinyl tile (the workhorse). Individual squares or planks, typically 6x6, 12x12, or 3x6 inches, backed with pressure-sensitive adhesive. Realistic grout-line printing mimics subway tile or marble. Best for smooth, painted drywall or existing flat tile. Removes cleanly with heat. Typical cost: roughly $2-$5 per square foot.
- Removable adhesive panels (the upgrade). Larger rigid or semi-rigid PVC or PET panels installed with a removable adhesive strip or light tack adhesive. Fewer seams than individual tiles, so they read like a real slab or large-format tile. Best for smooth surfaces; less forgiving around outlets. Typical cost: roughly $4-$9 per square foot.
- Removable wallpaper (the budget wildcard). Vinyl or textured wallpaper rated for kitchen use. Cheapest per square foot (often under $2) and easiest to cut around obstacles, but the least heat- and moisture-tolerant option and most likely to bubble near a stove. Best for an accent wall away from the cooking zone, not directly behind the range.
Coverage math before you buy
Measure the wall area between countertop and upper cabinets, plus the strip behind the stove and sink. Multiply width by height in inches, divide by 144, then add 10-15% for cuts and pattern matching.
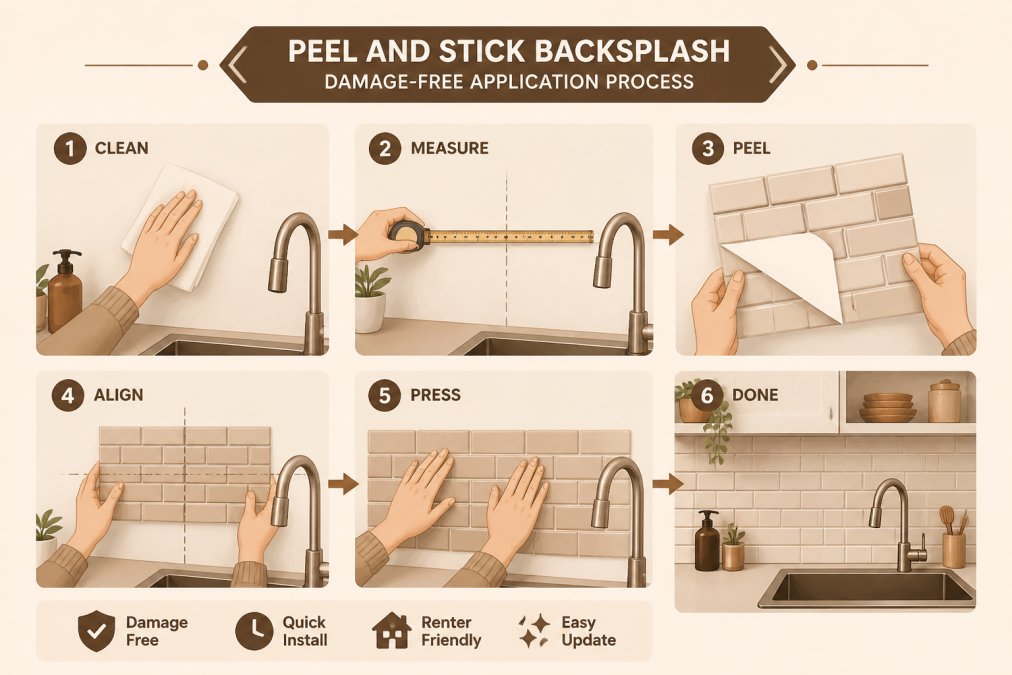
What makes peel and stick work, and where it fails
-
Adhesive strength is surface-dependent. Tiles hold firmly to smooth painted drywall, flat existing tile, and sealed surfaces, but fail on textured drywall, unsealed porous surfaces, and greasy walls. Clean with a degreaser and dry completely first.
-
Removal is clean only if you heat it. Cold adhesive grabs paint; warm adhesive releases. A hair dryer on low for 30-60 seconds per tile is the difference between a clean wall and a patched one.
-
Installation is fast but not foolproof. A standard run takes 30-60 minutes, mostly spent cutting around outlets and windows.
Apartment Therapy's kitchen renovation guide tested self-adhesive Smart Tiles in a kitchen environment and verified the product as a viable, renter-friendly solution for temporary kitchen upgrades.
Surface compatibility: the make-or-break check
Before buying any peel-and-stick product, identify what is on your wall:
- Painted drywall (smooth): The best-case surface. Clean, dry, and apply. Removal with heat is typically clean.
- Painted drywall (textured or orange-peel): Adhesive cannot fully contact the surface, so tiles lift at the edges. Use a smoothing primer or a rigid removable panel instead.
- Existing ceramic tile: Flat, glossy tile is an excellent substrate, adhesive bonds well and removal leaves the original tile intact. Avoid deep or crumbly grout lines.
Unsure what is under the paint? Press removable mounting tape to an inconspicuous spot, wait 24 hours, and remove it.
HomeArtiles' 2026 design trends report confirms that self-adhesive wall tiles are a leading home decor trend, driven by ease of installation, budget-friendly pricing, and the availability of realistic tile finishes.
These four renter-friendly materials offer different trade-offs in cost, durability, and ease of removal.
| Material | Cost per sq ft | Best for | Key difference |
|---|---|---|---|
| Peel-and-stick vinyl tile | $2-$5 | Smooth painted drywall | Realistic grout-line printing, removes cleanly with heat |
| Removable adhesive panels | $4-$9 | Smooth surfaces | Fewer seams, reads like real slab, less forgiving around outlets |
| Removable wallpaper | Under $2 | Accent wall away from stove | Cheapest option, easiest to cut, least heat and moisture tolerant |
| Magnetic or command-strip panels | Highest | Fragile or textured walls | Zero adhesive residue, safest removal, most limited finishes |
Removable Backsplash Ideas That Work Around Tight Spaces
Renters often face awkward layouts, a backsplash that wraps a window, stops short of a corner cabinet, or fits between a stove and a narrow wall. Explore other temporary kitchen solutions for renters to understand the broader context of renter-friendly improvements.
Peel and stick tiles come in individual squares, typically 6x6 or 12x12 inches, cut with a utility knife to fit around outlets, windows, and appliances.
Consider these placement strategies:
- Around windows: Cut tiles to frame the window without covering it, adding visual interest while keeping it functional.
- Between stove and counter: Measure the exact width, then cut tiles to fit snugly. No gaps, no overhang.
- Above sink to upper cabinets: The standard backsplash zone, which most removable tiles cover perfectly.
The real advantage: mistakes don't matter. A crooked tile peels off and reapplies; a piece cut too short gets another tile beside it.
HomeArtiles' 2026 design trends report confirms that self-adhesive wall tiles are a leading home decor trend, driven by ease of installation, budget-friendly pricing, and the availability of realistic tile finishes.
Performance Factors: Heat, Moisture, and Durability
Your backsplash sits in the kitchen's two hardest microclimates: the heat plume above the stove and the splash-and-steam zone around the sink. A temporary backsplash that lifts by month three is a deposit risk, match the material to the zone.
Heat: the stove zone
Most peel-and-stick vinyl and PVC tiles tolerate surface temperatures up to roughly 200°F, enough for boiling, sautéing, and oven use. The failure mode isn't melting; it's adhesive softening under sustained heat, letting edges curl and trap grease.
Practical rules for the cooking zone:
- Keep tile at least 6 inches from the stovetop edge where possible. If your range sits tight to the wall, use a removable panel rated for higher heat or leave that strip bare.
- Never place removable wallpaper directly behind the range. It is the least heat-tolerant option and the most likely to bubble.
- If you have a gas range, the open flame and higher ambient heat make vinyl tile a calculated risk. Rigid removable panels or a bare, easily cleaned wall strip are safer.
Moisture: the sink zone
Steam and splashing are the real durability test. Quality tiles use vinyl or PVC backing with waterproof adhesive; paper- or fabric-backed products warp and grow mildew. Look for tiles labeled "kitchen-safe" or "bathroom-rated."
- Adhesive type: Polyurethane and acrylic adhesives outperform rubber cement in humid conditions.
- Backing material: Vinyl and PVC outlast paper or fabric.
- Surface finish: Glossy finishes shed water and wipe clean more easily than matte, which can trap residue.
Cleaning without lifting edges
Aggressive cleaning is the fastest way to destroy a temporary backsplash:
- Wipe with a damp cloth and mild dish soap. Avoid abrasive pads and scouring powders, which dull the finish and catch tile edges.
- Do not flood the wall or spray cleaner at seams, moisture wicking behind a tile causes mildew and adhesive failure.
- For grease near the stove, use a degreaser on a cloth and wipe along the tile face rather than into the seams.
Realistic lifespan and failure modes
Most quality removable tiles last 3-5 years, comfortably longer than a typical lease. Failure modes are predictable: edge curl near the stove, lifting above the sink, and bubbling over textured drywall. Each is preventable with the right material for the zone and a clean, smooth surface.
Check the manufacturer specifications for waterproof ratings before purchasing, and confirm the heat rating if the tile will sit near the range. A product that is waterproof but not heat-rated is fine above the sink and wrong behind the stove.
Consider linking to best materials for rental kitchen sink organizers to understand how material durability affects your overall kitchen setup.
How to Remove Peel and Stick Backsplash Without Wall Damage
Removal determines whether you keep your security deposit. Done right, peel and stick tiles leave no trace; done wrong, they tear drywall or leave sticky residue.
Here's the safe removal method:
- Heat the adhesive: Use a heat gun or hair dryer on low heat for 30-60 seconds. Warm adhesive releases more easily than cold.
- Lift gently from one corner: Start at a top corner and peel slowly downward. Don't yank, let the heat do the work.
- Work your way across: Move horizontally, heating and peeling section by section to distribute stress and prevent tears.
- Remove residue carefully: Warm any remaining adhesive and rub gently with your thumb or a soft cloth. Avoid metal tools, which gouge drywall.
- Clean the wall: Wipe with a damp cloth to remove remaining residue.
The entire process takes 30-45 minutes for a standard backsplash area. Your wall should look exactly as it did before.
Common mistakes that damage walls: peeling without heating first, scraping with metal tools or razor blades, pulling at sharp angles instead of peeling straight out, and leaving adhesive residue that hardens.
Landlord Approval and Lease Protection
Here's the part most renters skip: asking permission first.
Email your landlord or property manager with photos of the product and explain it's completely removable.
Get written approval to protect yourself in a dispute.
If your landlord says no, respect that decision. Violating lease terms risks your deposit and rental history, not worth it.
Document the wall with photos before installation and after removal.
Planning Your Temporary Backsplash Project
Successful temporary kitchen backsplash projects follow a simple plan.
Step 1: Measure your space
Calculate square footage by multiplying width by height and dividing by 144, then add 10% for cuts and mistakes.
Step 2: Choose your style
Browse peel and stick options online or in store.
Consider linking to how to organize a tiny apartment kitchen in 2026 to integrate your backsplash choice into your overall kitchen design strategy.
Step 3: Prepare your wall
Step 4: Gather tools
Step 5: Install carefully
Start at the top and work downward.
Step 6: Let it set
Wait 24 hours before exposing your new backsplash to moisture or heat so the adhesive cures fully.
Your rental kitchen deserves to look intentional and polished.
Frequently Asked Questions
What can renters use as a temporary kitchen backsplash?
Renters have several damage-free options: peel and stick vinyl tiles (around $2.42 per square foot), removable wallpaper designed for kitchens, contact paper with decorative finishes, and adhesive-backed fabric panels. Peel and stick tiles offer the most realistic tile appearance and durability. Each option installs without tools or drilling, and all can be removed cleanly when you move. Choose based on your kitchen's moisture level and your aesthetic preference.
Are peel-and-stick backsplash tiles safe for rental walls?
Yes, when applied correctly to clean, dry surfaces. Peel and stick tiles are specifically designed to remove without leaving residue or damaging paint. However, always get written landlord approval before installation, even for temporary modifications. Test removal on a small, inconspicuous area first. Avoid applying directly over textured or freshly painted walls, as adhesion may fail or removal could pull off new paint.
How do you remove peel and stick backsplash without damaging the wall?
Heat the tiles gently with a hairdryer on low setting for 30 seconds to soften the adhesive, then peel slowly from a corner at a 45-degree angle. Work methodically across the wall rather than rushing. If residue remains, use a plastic scraper or credit card to gently lift it, then clean with rubbing alcohol on a soft cloth. This method prevents gouging paint or drywall. Test on one tile first to ensure your wall's paint condition allows safe removal.
Can you put peel-and-stick tiles over an existing backsplash?
Yes, but surface preparation is critical. Clean the existing backsplash thoroughly with degreaser and let it dry completely. If it's glossy, lightly sand it to improve adhesion. Peel and stick tiles work best over smooth, non-porous surfaces like ceramic or glass. Avoid textured or uneven surfaces where tiles won't make full contact. Test adhesion in a corner first, as some existing finishes may not hold the new tiles securely, especially in high-heat areas near the stove.
