


Table of Contents
- Why Under Sink Storage Fails Renters (And What Actually Works)
- No-Drill Cabinet Organization: Tension Rods, Suction Cups, and Adhesive Hooks
- Under Sink Pull-Out Organizers That Slide Around Plumbing
- Small Kitchen Storage Hacks for Tight Sink Cabinets
- Weight Capacity, Waterproofing, and Material Longevity
- Lease Compliance: What Your Rental Agreement Says About Cabinet Modifications
- Conclusion: Building a Damage-Free Under Sink System
- Frequently Asked Questions
Last Updated: September 13, 2026
Why Under Sink Storage Fails Renters (And What Actually Works)
Most renter-friendly under sink storage solutions fail for one reason: the space under a kitchen sink was designed for plumbing, not storage. A garbage disposal, P-trap, supply lines, and shutoff valve occupy the same cabinet you're organizing, and anything that ignores that geometry will either block a valve you need in an emergency or fall apart within a month.
This guide from SinkElle covers what holds up in a rental: no-drill cabinet organization, pull-out systems built around plumbing, and the weight and moisture limits most listings never mention. Three things matter. First, every solution must install and remove without drilling.
Second, it has to work around the plumbing, not against it. Third, it has to survive the humidity that builds up under a sink every single day.
Below: which systems fit each cabinet shape, what they cost, and how to check your lease first.
No-Drill Cabinet Organization: Tension Rods, Suction Cups, and Adhesive Hooks
No-drill cabinet organization transfers load to surfaces that already exist: cabinet walls, shelf undersides, and the door. Tension rods wedge between parallel surfaces, suction cups grip smooth non-porous finishes, and adhesive hooks bond to flat panels and release with a pull tab. Each has a real load ceiling, and the package number is almost never the one to trust under a sink.
Here is how the three methods compare on the two things that matter most to a renter: how much weight they hold, and how cleanly they come off.
| Method | Realistic Load Limit | Best Surface | Removal |
|---|---|---|---|
| Tension rod (spring-loaded) | 5-15 lb spread across the span | Smooth, rigid, parallel side walls | Lift out; no residue |
| Suction cup | 3-8 lb per cup when new | Tile, glass, sealed metal | Twist tab; no residue |
| Adhesive hook (pull-tab) | 2-5 lb per hook | Flat, sealed, non-porous panels | Pull tab straight down; may leave residue |
Those ranges assume a clean surface, room temperature, and a fresh product. Under a sink, humidity and heat cut them: a suction cup holding a 6 lb caddy in January may drop it in July, and a 20 lb tension rod sags if the walls flex or the span exceeds its stated maximum.
Tension rods. Best between cabinet side walls for spray bottles and brushes. They need consistent width and a non-flexing surface. Measure the span at the exact mounting height, since cabinet interiors taper, and avoid spans interrupted by a pipe, a rod with a P-trap in the middle has nothing to push against on one side.
Suction cup accessories. Work on tile, glass, and sealed metal; they fail on painted wood, textured finishes, and anywhere moisture pools. Re-seat monthly, and immediately if the cup edge lifts, that's the warning sign before a fall. Clean surface and cup with warm soapy water, dry fully, then press.
Self-adhesive storage hooks. Hold light items like sponges, scrubbers, and small caddies. Clean with rubbing alcohol, press for a full 30 seconds, and wait 24 hours before loading. To remove, warm the adhesive with a hair dryer on low for 30-60 seconds, then pull the tab straight down and parallel to the wall, pulling out tears paint and leaves residue.
A common pattern: adhesive holds for months, then fails all at once on a hot day. That's the adhesive softening as cabinet temperature rises, not a defect. If your kitchen gets direct afternoon sun, treat every adhesive rating as roughly half its stated capacity.
Under Sink Pull-Out Organizers That Slide Around Plumbing
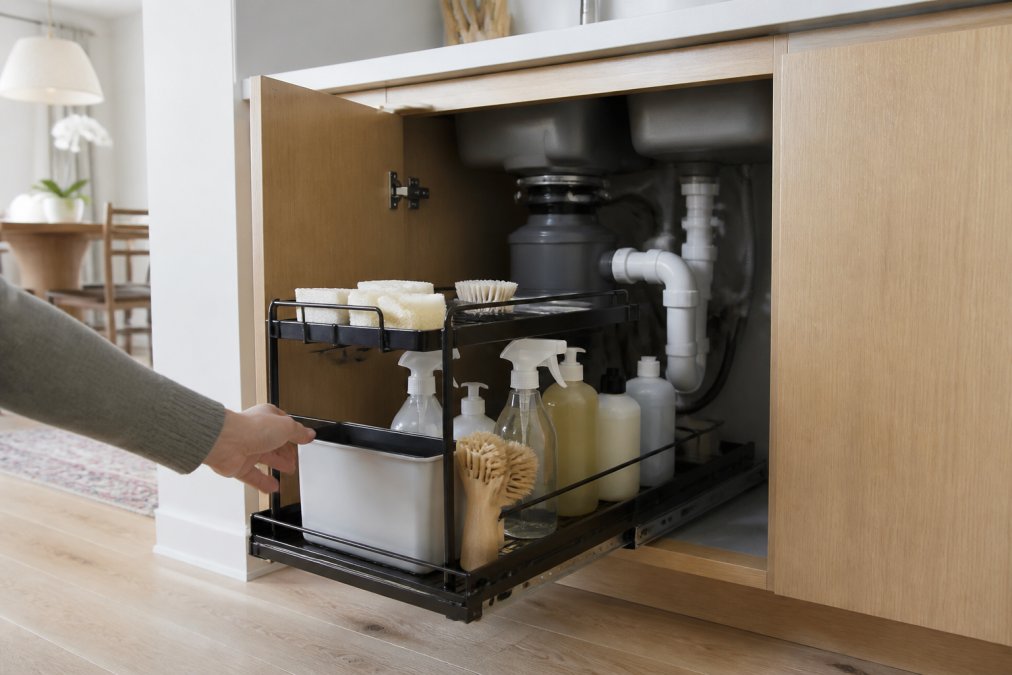
Under sink pull-out organizers are the most reliable option for renters because they sit on the cabinet floor and never touch the walls. The best models use a two-tier sliding drawer that clears the P-trap and disposal by routing storage to the left and right of the plumbing. But "clears the plumbing" only works if you measured first, the step most guides skip, and why so many organizers get returned.
Measure for the plumbing, not the cabinet
You need four numbers before you buy anything:
- Interior width, side wall to side wall, measured at the cabinet floor.
- Interior depth, front edge to back wall, again at the floor.
- Clearance height on each side of the plumbing, from the cabinet floor up to the lowest obstruction on the left side, then the same on the right. These are often different.
- Plumbing footprint, the horizontal distance the P-trap, disposal, and supply lines occupy at floor level, measured left to right.
Subtract the plumbing footprint from the interior width for the floor space you actually have, split between the two sides. A 30-inch cabinet with a 14-inch disposal and P-trap footprint leaves roughly 16 inches of usable floor, often unevenly divided.
Match the organizer to the pipe configuration
Most under-sink setups fall into one of three shapes, and each calls for a different organizer type:
- Center P-trap, no disposal. Plumbing occupies a narrow vertical column in the middle. A two-tier pull-out works well because both tiers span the full cabinet width behind and in front of the trap; look for a top tier that sits above the trap's low point.
- Side-mounted disposal with offset trap. Plumbing crowds one side. A single-tier pull-out on the clear side plus a narrow stackable rack on the crowded side beats one wide unit that has to dodge everything.
- Rear-wall supply lines with a low trap. Supply lines along the back wall are easy to clear; the constraint is the trap's low point. Measure floor to the bottom of the trap curve, that's your maximum height for anything sliding under it.
Clearance rules that prevent returns
A two-tier unit needs more vertical clearance than a single tray, since the top tier must slide out without hitting the disposal housing or trap. Leave at least 1 inch above the top tier at full extension, and confirm the stated height measures to the top of the frame, not the loaded drawer.
Also check the slide direction. Some pull-outs extend straight out; others need a few inches of side clearance to angle out. In a cabinet with a disposal on one side, a straight-pull unit is usually the safer choice.
The SinkElle 2 SlideNest Organizer is built for this problem: a durable metal frame with two pull-out tiers, so you can reach the back without kneeling around the disposal. At $55.99, it's the piece most renters should start with, it solves the geometry problem first, organization second.

Small Kitchen Storage Hacks for Tight Sink Cabinets
Small kitchen storage hacks that work share one trait: they use vertical and door space, not floor space. In a tight sink cabinet the floor already competes with plumbing, so the usable real estate is above and beside it.
The SinkElle CabinetFlow Hanging Organizer ($44.99) hangs beneath a cabinet or shelf and holds paper towels, dishcloths, cutting boards, and pot lids without consuming counter or cabinet-floor area. For narrow gaps beside the sink base, the SinkElle FlowCart Storage Rack ($30.99) is a slim rolling cart that slides into spaces too tight for a fixed shelf, and its wheels mean you can pull the whole unit out to reach what's behind it.

A few hacks worth trying before you buy anything:
- Hang a tension rod across the cabinet's upper interior to suspend spray bottles by their trigger necks
- Use a self-adhesive hook on the inside of the cabinet door for a small caddy of sponges and scrubbers
- Stack a two-tier rack on one side of the disposal and leave the other side clear for tall bottles
- Store cleaning supplies in a slim rolling cart in the gap between the sink base and the stove
Weight Capacity, Waterproofing, and Material Longevity
Weight capacity and moisture resistance decide whether an under sink system lasts a year or a decade. Under-sink cabinets are the most humid spot in a kitchen, and cheap particleboard or untreated wire will swell, rust, or mildew long before the rest of your kitchen shows wear.
Material choice matters more than price. Here's how the common options compare:
| Material | Moisture Resistance | Typical Load Tolerance | Best For |
|---|---|---|---|
| Coated metal | High | Heavy bottles, caddies | Under-sink and utility cabinets |
| Stainless steel | High | Cookware, heavy items | Wet or humid areas |
| Bamboo | Moderate | Spices, light jars | Countertops, dry pantries |
| Non-woven fabric | Low | Towels, light essentials | Doors, closets, dry rooms |
| Untreated wire | Low | Light items only | Dry, ventilated spaces |
The SinkElle PanNest Adjustable Pot Organizer ($38.99) uses carbon and stainless steel, right for a humid cabinet. The SinkElle 2-Tier Pantry Storage Rack ($71.99) is bamboo, better for a dry pantry or countertop than directly under a sink. The SinkElle DoorNest 5-Tier Hanging Organizer ($65.99) uses breathable non-woven fabric, which resists mildew better than solid plastic but shouldn't sit in standing water.

Lease Compliance: What Your Rental Agreement Says About Cabinet Modifications
Lease compliance is the step renters skip, and the one that costs money. Most residential leases prohibit alterations requiring drilling, and many define "alteration" broadly enough to include adhesive-backed hardware that damages the finish on removal.
Read your lease for three specific clauses before you install anything:
- Alterations clause: Look for language about drilling, mounting, or affixing items to walls, cabinets, or fixtures
- Damage and wear clause: Check how the lease defines normal wear versus tenant-caused damage, since adhesive residue often falls into the second category
- Move-out inspection terms: Note the deadline for reporting issues and whether you're required to patch or repaint
If your lease is silent on removable organizers, document the cabinet's condition with dated photos before installation. That record protects your deposit if a landlord later claims damage.
For broader guidance on tenant rights and security deposits, the U.S. Department of Housing and Urban Development tenant resources publishes state-level information, and the Consumer Financial Protection Bureau covers deposit and rental agreement basics. When a lease term is unclear, USA.gov's housing and rental assistance directory points to local tenant advocacy resources that can review the language for you.
Conclusion: Building a Damage-Free Under Sink System
The hard part of renter-friendly under sink storage solutions isn't finding products, it's building a system that respects your plumbing, your lease, and the humidity that tests every material in that cabinet.
Start with a pull-out organizer that routes around the disposal, add a hanging piece for door and shelf space, and match materials to the moisture level. SinkElle builds for exactly this problem: minimalist Scandinavian-inspired organizers with waterproof materials, no tools required, and a design made to fit tight sink areas without permanent changes. Get started with SinkElle and turn the cabinet you've been avoiding into the most functional storage in your kitchen.
Frequently Asked Questions
What are some good storage ideas for under the sink?
Pull-out sliding organizers work best because they let you reach items without crawling into the cabinet. A two-tier metal unit like the Sinkelle 2 SlideNest Organizer ($55.99) fits around most plumbing and keeps cleaning supplies separated from sponges. Pair it with a tension rod across the cabinet width for spray bottles, and use self-adhesive hooks on the cabinet door for scrub brushes. Stick to freestanding, modular pieces so nothing attaches permanently to the cabinet walls or pipes.
What is the best storage option for under the kitchen sink?
For renters, a pull-out drawer system is the most practical choice. It slides around the garbage disposal and P-trap instead of forcing you to remove them, and it lifts out entirely when you move. The Sinkelle 2 SlideNest Organizer ($55.99) has a metal frame that resists moisture better than plastic bins, which tend to warp near leak-prone pipes. Measure the cabinet's interior width and the height below the disposal before ordering, since most standard under-sink cabinets leave 14 to 18 inches of usable vertical space.
How do you organize a small under-sink cabinet without drilling?
Start with the vertical space above the pipes. A tension rod wedged between the cabinet walls holds spray bottles, and a hanging organizer like the Sinkelle CabinetFlow Hanging Organizer ($44.99) mounts under the shelf without screws. Suction cup caddies work on smooth cabinet doors but lose grip on textured or painted surfaces, so test one before loading it. For the floor of the cabinet, use a freestanding two-tier rack. Everything should lift out in under a minute when you move out.
Will under sink organizers damage my rental or leave marks?
Freestanding and tension-mounted systems cause no damage because they never touch the cabinet with adhesive or screws. Self-adhesive hooks can leave residue or pull paint from cheap melamine cabinet doors, so remove them slowly with a hair dryer to soften the glue. Suction cups typically leave nothing behind. Check your lease for clauses about cabinet modifications before installing anything that sticks, and photograph the cabinet interior before and after so you have proof of condition at move-out.