


Table of Contents
- Why Kitchen Sponges Trap Moisture and Bacteria
- How to Dry a Kitchen Sponge Between Uses
- The Best Storage Solutions for Keeping Sponges Dry
- How to Clean a Kitchen Sponge Regularly
- How Often to Replace a Kitchen Sponge
- Your Daily Routine for a Dry, Clean Sponge
- Frequently Asked Questions
Last Updated: October 12, 2026
Why Kitchen Sponges Trap Moisture and Bacteria
Kitchen sponges are designed to absorb water, and that porous structure traps water in countless tiny pockets, damp environments that breed germs, yeasts, and molds.
When a sponge stays wet between uses, bacteria multiply rapidly, odor develops, and deterioration accelerates, which is why learning how to keep kitchen sponges dry and clean is essential.
A sponge that dries properly stays fresher, lasts longer, and keeps dishes genuinely clean.
The real issue isn't the sponge itself, it's storage and drying habits.
How to Dry a Kitchen Sponge Between Uses
Squeeze Out Excess Water Thoroughly
After washing dishes, squeeze your sponge hard, most people don't squeeze thoroughly enough. Remove as much water as possible by hand before air-drying.
Hold it over the sink and apply firm, steady pressure, squeezing 5-10 times like you're wringing a wet cloth until no water drips.
Then rinse briefly under running water to remove food residue and squeeze again, removing both trapped water and debris.
A properly wrung-out sponge feels noticeably lighter; if it still feels heavy, squeeze more.
Air-Dry Your Sponge Properly
After squeezing, place your sponge somewhere with good airflow, the critical step most people skip.
Position it upright or at an angle, not flat, so air circulates around all sides; flat sponges trap moisture underneath.
The best locations for air-drying include:
- A designated sponge holder with drainage holes
- The edge of a dish rack positioned to catch air
- A hook or stand near the sink
- Any spot where the sponge won't sit in standing water
Avoid storing sponges:

- Under the sink in dark, damp cabinets
- In a closed drawer
- On a flat surface touching the counter
- Inside a container without drainage
Air-drying takes 4-8 hours depending on humidity and circulation, overnight in a well-ventilated kitchen, longer in humid spaces.
The Best Storage Solutions for Keeping Sponges Dry
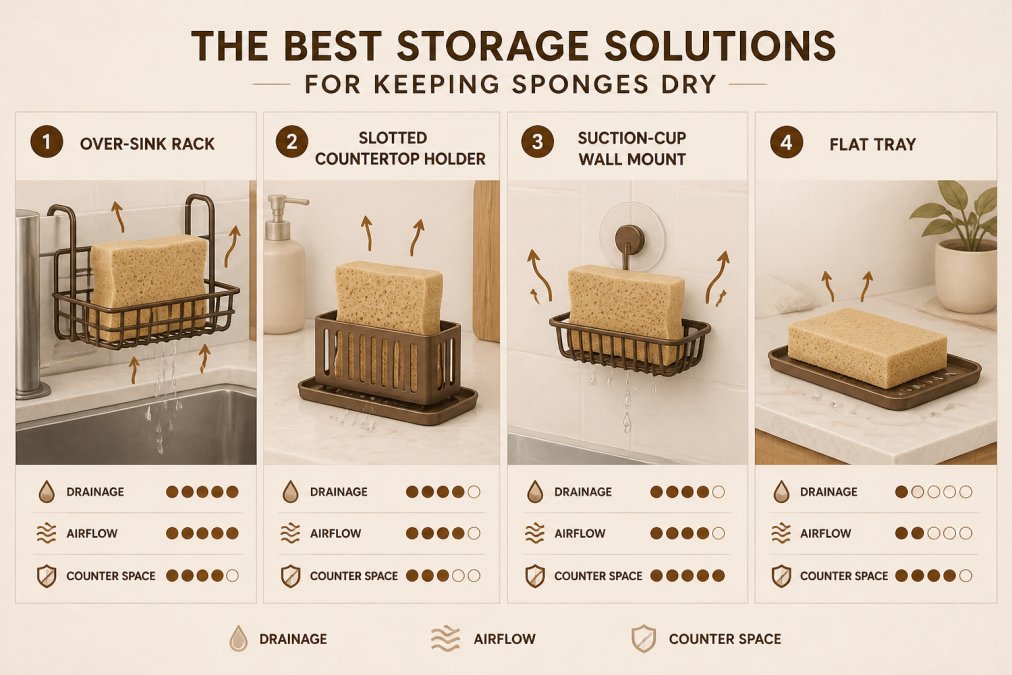
What matters is whether air can reach all six faces of the sponge, whether water can escape the holder, and whether the holder stays clean. Those three variables separate a setup that keeps a sponge dry from one that quietly keeps it wet.
The Four Storage Categories, Compared
Almost every sponge storage option falls into one of four categories. Each has a different airflow profile, drainage behavior, and cleaning burden.
1. In-sink or over-sink racks. These suspend the sponge above the basin floor, so drainage and airflow are excellent.
**2.
3. Suction-cup or adhesive wall mounts. These hold the sponge vertically, so airflow is excellent and drainage automatic.
4. Flat trays and decorative caddies without drainage. The most common and worst for drying: water pools underneath, and even a thoroughly wrung sponge reabsorbs it overnight.
What to Look For in Any Holder
Regardless of category, a holder that keeps a sponge dry has these features:
- Elevation. The sponge should not sit flush against a non-porous surface. Wire grids, angled slots, and open frames all work.
- Drainage that exits the holder. Water that drips into a tray and stays there is not drainage. Look for a spout, a slope, or an open bottom.
- Separation between items. If the holder also stores dish cloths or scrub brushes, those items should not touch the sponge. A wet cloth pressed against a sponge transfers moisture back into it.
- A cleanable surface. Non-porous materials (stainless steel, coated wire, hard plastic) wipe clean. Porous materials (bare wood, unsealed ceramic, fabric liners) absorb water and residue and are harder to keep sanitary.
Holder Hygiene: The Step Most People Skip
A sponge holder that is never cleaned becomes a reservoir: food particles, soap scum, and hard-water minerals build up in the slots and tray, staying damp even when the sponge is dry and recontaminating it every time it's placed back.
A practical holder-cleaning routine:
- Daily: Tip out any standing water from the tray or base.
- Weekly: Remove the holder, wash it with hot soapy water, and scrub the slots with a small brush. Rinse and air-dry before putting the sponge back.
- Monthly: Check for hard-water film or discoloration in crevices. A vinegar soak (equal parts white vinegar and water, 15-30 minutes) dissolves mineral buildup. Rinse thoroughly.
- As needed: If the holder smells musty even after washing, replace it, some plastic and wood holders develop odor in the material itself and cannot be fully cleaned.
Matching the Holder to Your Kitchen
The right choice depends on your sink layout and counter space:
- Undermount sink with a wide rim: An over-sink rack or a rim-mounted holder keeps the sponge off the counter entirely and drains directly into the basin.
- Farmhouse or apron-front sink: Wall-mounted or suction-cup holders on the backsplash usually work better than over-sink racks, which can block the basin.
- Limited counter space: A wall mount or an over-sink rack frees the counter. A countertop holder with a large footprint is the wrong choice here.
- Double-basin sink: A rack that spans the divider keeps the sponge over the basin without blocking either side.
A Note on Sponge Materials and Drying Time
Storage interacts with sponge material. Cellulose sponges (the classic yellow-and-green type) hold water longer and dry more slowly than open-cell synthetics. Compostable and plant-based sponges vary widely: some dry quickly, others stay damp for a full day.
With a slow-drying material, storage matters even more: a cellulose sponge in a flat tray stays damp well over a day, while the same sponge on an over-sink rack dries in 4-8 hours. Material and holder are a system, not separate decisions.
How to Clean a Kitchen Sponge Regularly
There's a meaningful difference between three things people lump together: removing food residue, drying the sponge, and sanitizing it. Each does something the others do not.
Sinkelle HookNest Kitchen Sponge Holder →
- Rinsing removes loose food particles and soap residue. It does not kill bacteria.
- Drying removes the moisture bacteria need to multiply. It does not kill what is already there.
- Sanitizing reduces viable bacteria on the sponge. It does not remove food residue, and it does not keep the sponge dry afterward.
A sanitized sponge left wet regrows bacteria within hours; a dried but never-sanitized sponge accumulates bacteria over days. You need all three, in order: rinse, wring, sanitize on schedule, then dry.
What Each Sanitizing Method Can and Cannot Do
Microwave (wet sponge, high heat). One of the most effective home methods for reducing bacteria and yeast.
Dishwasher with heated dry. Convenient and consistent, hot water plus sustained heat reduces bacteria effectively.
Boiling water or a hot water soak. Submerging a sponge in boiling water for several minutes reduces many bacteria with no special equipment.
White vinegar soak. A 5-10 minute soak in equal parts white vinegar and water is often recommended.
A Realistic Sanitizing Schedule
Sanitizing frequency depends on what the sponge has touched:
- Normal dishwashing use: once or twice per week.
- After raw meat, poultry, or fish cleanup: sanitize immediately, or better, use a separate sponge dedicated to that task and sanitize it right after.
- After wiping up spills from the floor, trash area, or pet areas: sanitize before returning the sponge to dish duty, or retire it to a non-food cleaning role.
- If the sponge has been sitting wet for several hours: sanitize and then dry it thoroughly.
Sanitizing more than twice a week to control odor signals the sponge is near the end of its life, not that you need to sanitize more often.
What Sanitizing Cannot Fix
Sanitizing reduces bacteria; it does not sterilize, remove the food particles and oils that feed bacteria, or repair a torn, thinned, or deeply discolored sponge. Nor does it substitute for drying, a sanitized sponge left in a puddle will be as contaminated as an unsanitized one within a day.
This is why the order matters: rinse and wring first, sanitize on schedule, then dry completely. Skipping any step undermines the others.
How Often to Replace a Kitchen Sponge
Signs Your Sponge Needs Replacing
Most kitchen sponges last 2-4 weeks with regular use and proper care, longer if used lightly, faster in heavy-use kitchens.
Watch for these signs that replacement time has come:
Visible deterioration: The sponge is thin, flaking, or breaking apart. Material is separating or crumbling.
Persistent odor: Even after sanitizing, the sponge smells bad, bacterial or mold colonies have become too established to eliminate.
Loss of scrubbing power: The sponge is worn smooth or too soft to clean properly.
Visible mold or slime: Any fuzzy growth, slime layer, or visible contamination means it's time to replace.
Your Daily Routine for a Dry, Clean Sponge
The simplest way to keep kitchen sponges dry and clean is a daily routine. Consistency matters more than perfection.
Here's what works:
After each use: Rinse under running water to remove food debris, then squeeze thoroughly multiple times, wringing it out like a wet cloth.
Monthly assessment: Every month, check whether the sponge still performs well; replace it if it shows wear or persistent odor.
This routine takes minimal time but makes a dramatic difference in sponge longevity and kitchen hygiene.
For apartment dwellers or anyone with limited counter space, the CDC's guidance on kitchen hygiene and cross-contamination emphasizes that proper drying and storage of cleaning tools prevents bacteria from spreading to food preparation surfaces.
The SinkElle FlowRack Pro Caddy simplifies this routine by combining proper drainage with organized storage.

Frequently Asked Questions
How do you keep a kitchen sponge dry between uses?
Squeeze out excess water thoroughly after each use, then place your sponge in an upright position where air can circulate around all sides. A kitchen sponge holder with drainage prevents water from pooling underneath. Position it near a window or in a well-ventilated area. Avoid leaving sponges in closed cabinets or flat on wet countertops, where moisture gets trapped and bacteria thrive.
Where should you store a kitchen sponge to keep it dry?
Store sponges in a dedicated holder with drainage holes or a spout that directs water back into the sink. The Sinkelle FlowRack Pro Caddy ($46.99) drains water directly into the sink basin, preventing soggy sponges. Position your holder on the countertop next to the sink in a spot with good airflow. Avoid storing sponges in dark, damp areas like under-sink cabinets or inside closed drawers, which trap moisture and encourage mold growth.
How often should you clean or replace a kitchen sponge?
Sanitize your sponge 2-3 times per week using the microwave method (microwave a damp sponge for 2 minutes) or dishwasher heated dry cycle. Replace the sponge entirely every 2-4 weeks, or sooner if it develops persistent odors, visible mold, or deteriorates. Signs it's time to replace include dark spots, a sour smell that doesn't fade after sanitizing, or visible wear. Regular cleaning extends sponge life, but replacement is necessary for food safety.
Can a kitchen sponge dry out completely in the sink?
No. A sponge sitting in or near the sink basin will absorb water from splashing, rinsing, and humidity. This is why proper drainage and airflow are essential. Even a 'dry' sponge left flat on a wet surface reabsorbs moisture. Using a sponge holder with drainage ensures water runs away rather than pooling underneath, allowing your sponge to dry between uses and stay fresher longer.