


Table of Contents
- Why Your Small Kitchen Feels Smaller Than It Is
- Step 1: Declutter and Sort by Zone
- Step 2: How to Maximize Kitchen Counter Space
- Step 3: Best Kitchen Cabinet Organizers for Deep Storage
- Step 4: Small Kitchen Storage Hacks for Walls and Doors
- Step 5: Organize Around the Sink and Under It
- Step 6: Build Habits That Keep the Kitchen Organized
- Step 7: A 10-Minute Daily Reset Routine
- Frequently Asked Questions
Last Updated: September 4, 2026
Why Your Small Kitchen Feels Smaller Than It Is
The average apartment kitchen holds hundreds of items, yet most of us use fewer than half of them weekly (apartmenttherapy.com). The real problem isn't your square footage; it's that you haven't defined a purpose for each inch of space.
Most renters treat every surface as temporary, so they never build a system that works. At SinkElle, we've found that the difference between a chaotic kitchen and an efficient one comes down to intentional zones, not cabinet size.
Step 1: Declutter and Sort by Zone
The first step to organize small apartment kitchen spaces is removing what doesn't belong. Pull everything out of your cabinets, drawers, and pantry, then group items into four piles: keep daily, keep weekly, store elsewhere, and donate.
A common mistake is decluttering by category across the whole kitchen at once. Instead, work zone by zone: food prep, cooking, cleaning, and coffee or drinks. This approach, recommended by professional organizers surveyed by Apartment Therapy, prevents you from feeling overwhelmed and ensures each zone only contains items you use there.
Be ruthless with duplicates. If you have three spatulas or four mismatched mugs, keep your favorite and pass the rest along. Purge expired spices, stale pantry goods, and any gadget you haven't touched in a year.
Step 2: How to Maximize Kitchen Counter Space
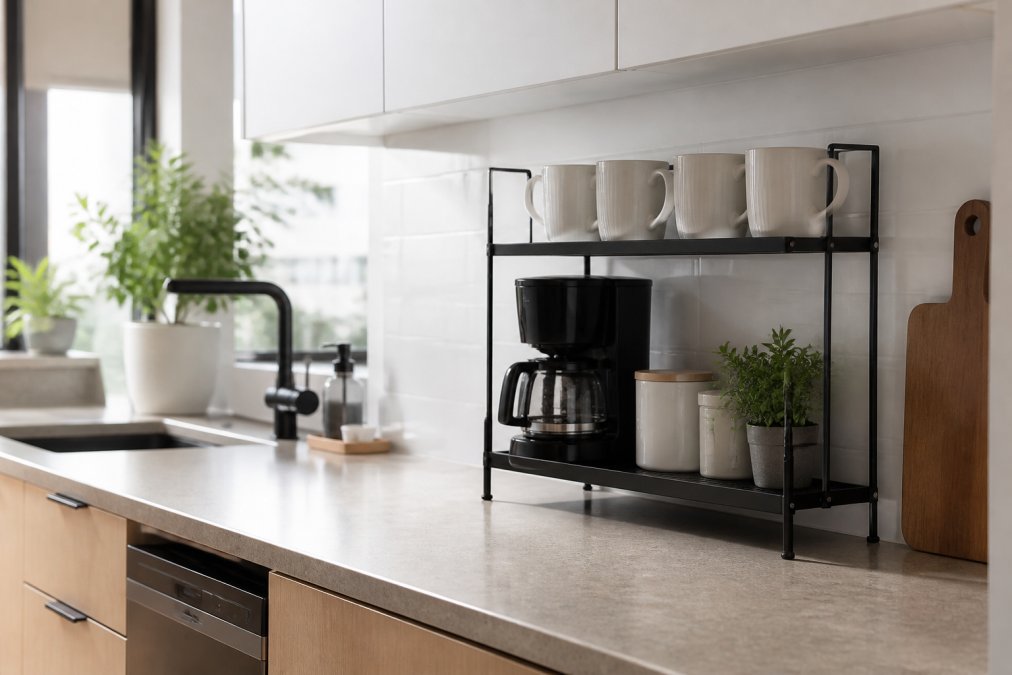
Counter space is the most valuable real estate in a small kitchen, yet it's usually buried under appliances. To maximize kitchen counter space, decide what earns a permanent spot: typically a coffee maker, a knife block, and maybe a toaster. Everything else gets stored or put away after use.
The secret weapon is vertical layering. A Sinkelle CounterRise 2-Tier Shelf lets you stack coffee mugs and supplies upward, freeing the footprint below for prep work. This two-tier approach doubles your usable surface without expanding your counter's dimensions.

Consider an appliance garage or a rolling cart to hide rarely used gadgets. If you're renting, look for non-permanent solutions like a movable kitchen island alternative. The goal is a clear landing zone beside the sink and stove.
Step 3: Best Kitchen Cabinet Organizers for Deep Storage
Deep cabinets become black holes without a system. The best kitchen cabinet organizers make every layer accessible, so you stop buying duplicates of items you forgot you owned.
Start with risers and stackable bins to create a second level inside tall cabinets. For lower cabinets, pull-out drawers or baskets turn the back corner into usable storage. The Sinkelle PanNest Adjustable Pot Organizer holds pots, pans, and lids vertically instead of stacking them, stopping the frustrating tumble of cookware.

Drawer dividers keep utensils and cutlery separated so you can grab a whisk without digging through measuring spoons. For upper cabinets, the Sinkelle CabinetFlow Hanging Organizer creates an extra storage tier beneath existing shelving for cutting boards and mugs.

Step 4: Small Kitchen Storage Hacks for Walls and Doors
When cabinet space runs out, the walls and the backs of doors are the last frontier. But for the roughly 35% of U.S. households that rent, the standard advice, drill into tile, mount a heavy rail, screw hooks into the door, is a non-starter. You can claim this vertical space with zero permanent damage, using hardware that comes off clean in under a minute.
The rental-safe toolkit: pressure, adhesive, and gravity.
- Tension rods (the workhorse). A spring-loaded tension rod costs $8-$15 at The Home Depot or Target. Install one vertically between the countertop and the upper cabinet to create a narrow, floor-to-counter divider that holds cutting boards, baking sheets, or a paper towel roll. Install two horizontally inside a deep cabinet to create a second tier for spray bottles. The mechanism is pure friction, no screws, no adhesive, no residue.
- Command-brand adhesive strips and hooks. The 3M Command line is specifically engineered for apartments; the strips hold up to 7.5 lbs per pair on painted drywall and remove cleanly with a slow pull on the tab. Use them to hang a magnetic knife strip alternative (a lightweight bamboo utensil holder), a dish towel bar inside the cabinet door, or a small hook for measuring cups. The trade-off: they fail on textured walls and in high-humidity areas above a kettle. Test the strip on an inconspicuous spot first.
- Over-the-door organizers that use the hinge pin. Most over-the-door racks hook over the top edge of the door, which can bind against the frame. A better rental solution is a hinge-pin hook: you loosen the top hinge pin, slide the hook over it, and retighten. This holds up to 25 lbs on a standard interior door and leaves the door edge and frame untouched. Use it for pantry goods, cleaning supplies, or pot lids.
What to avoid when you rent:
- Peel-and-stick tiles or backsplash panels. They often leave a sticky residue that requires Goo Gone and a lot of elbow grease to remove.
- Suction-cup mounts above the sink. They fail within weeks due to steam and temperature swings.
- Any adhesive hook rated over 10 lbs on hollow-core doors. The door's internal structure can crush, leaving a visible dent.
The vertical space above the cabinets.
Most renters ignore the gap between the top of the upper cabinets and the ceiling, often 12 to 18 inches of dead air. This is prime storage for items you use less than once a month: the slow cooker, the holiday platter, the punch bowl. Use sturdy, lidded, clear bins and label the front. The trade-off is accessibility; you'll need a step stool, so this zone is for 'store elsewhere' items.
Step 5: Organize Around the Sink and Under It
The sink is the busiest square foot in any small kitchen, yet it's also where most organization systems collapse. Plumbing geometry makes the under-sink cabinet a nightmare of angles, and the workflow above the sink is rarely planned. Map the space before you buy anything, then design for the 'clean zone', not just for storage.
Step 1: Map the plumbing before you shop.
Measure the interior width, depth, and height of the under-sink cabinet. Then trace the P-trap: note its exact horizontal position, how far it drops, and where the supply lines run. A standard P-trap curve takes up roughly 6 inches of depth and 8 inches of height; a garbage disposal adds 6-8 inches (homedepot.com). Most organizers fail because they assume a rectangular space; the under-sink area is effectively an L-shape or U-shape around the plumbing.
Step 2: Use a two-tier system that works around the pipes.
- Bottom tier (the floor): Place a shallow, waterproof tray (a $10 boot tray from IKEA or a plastic dishpan) directly on the cabinet floor. This catches drips from cleaning bottles and prevents rust or water damage to the cabinet base. On this tray, store the heaviest, least-frequently-used items: the spare dish soap jug, the all-purpose cleaner refill, the drain snake.
- Top tier (the pipes): Install a tension rod system (two rods, front-to-back) to create a shelf that sits above the P-trap. This shelf holds daily-use items: dish soap, scrub brushes, sponges, and rubber gloves. The rods cost $15-$20 for a pair and require no drilling. The key mechanism is that the rods brace against the cabinet's side walls, not the plumbing, so they stay level even when the pipes vibrate.
Step 3: The 'clean zone' above the sink.
The area directly above the sink is the 'clean zone', where washed items land before they're dried and put away. If it's cluttered with a dish rack, soap bottle, and sponge holder, you have no landing pad. A two-tier bamboo rack (like the Sinkelle 2-Tier Pantry Storage Rack) holds dish soap and a sponge on top, while the bottom tier becomes a drying area for a cutting board or colander. The bamboo is water-resistant, not waterproof, wipe it down weekly to prevent mold.
The maintenance angle competitors miss:
Most guides tell you to 'organize under the sink' and then move on. This area reverts to chaos because cleaning supplies get used, drip, and are shoved back randomly. The fix is a 60-second weekly reset: every Sunday, pull everything out, wipe down the tray, and return items to their designated spots.
Step 6: Build Habits That Keep the Kitchen Organized
An organized kitchen is not a one-time project; it's a set of daily behaviors. Adopt the "one in, one out" rule: every time you bring home a new gadget or pantry item, something old must leave. This prevents the slow creep of clutter.
Another key habit is the "reset before bed" ritual. Spend five minutes each evening wiping counters, putting away clean dishes, and returning small appliances to their homes. This ensures you start each morning with a clear workspace.
Designate a "drop zone" near the kitchen entrance for keys, mail, and bags. This prevents the counter from becoming a catch-all for non-kitchen items, a leading cause of clutter in tiny kitchens.
Step 7: A 10-Minute Daily Reset Routine
Consistency beats intensity. A 10-minute daily reset routine is more effective than a marathon cleaning session every Sunday because it prevents messes from accumulating.
Here is the routine broken into manageable steps:
- Clear the sink area and load dirty dishes into the dishwasher or wash them by hand (3 minutes).
- Wipe down the counters and the stovetop with a damp cloth (2 minutes).
- Return all small appliances, cutting boards, and ingredients to their designated storage spots (3 minutes).
- Sweep the floor and empty the trash if needed (2 minutes).
This routine targets the most visible areas first, creating a sense of order that motivates you to maintain it. Over time, these actions become automatic.
The result is a kitchen that supports your cooking workflow rather than fighting it. Prepping meals takes less time because you're not searching for tools, and cleaning up feels less like a chore because everything has a clear home.
Organizing a small apartment kitchen is challenging, but it's a challenge you can win with the right system. The real difficulty isn't finding space; it's committing to a plan and building habits that maintain it. SinkElle's collection of space-optimized organizers, from the CounterRise 2-Tier Shelf to the PanNest Pot Organizer, is designed to make this process effortless. Get started with SinkElle and turn your cramped kitchen into the most functional room in your apartment.
Frequently Asked Questions
What is the best organizer for a small kitchen?
The best organizer targets your most wasted space. For countertops, a 2-tier shelf like the Sinkelle CounterRise doubles your usable area for daily items. Inside cabinets, an adjustable pot organizer like the PanNest keeps cookware stackable. For a quick win, use a hanging organizer under a shelf to clear counter clutter. Choose tools based on your specific problem area, not just general gadgets.
How do you organize a kitchen with no counter space?
When counter space is missing, look up and down. Use wall-mounted racks or magnetic strips for knives and spices. Install a hanging organizer under an upper cabinet for mugs or cutting boards. Inside cabinets, add shelf risers to double vertical storage. Use a rolling cart or kitchen island alternative for extra prep space that can move out of the way when not in use.
How can I maximize storage in a tiny kitchen without renovations?
Focus on non-permanent, tool-free solutions. Start by decluttering to remove items you do not use. Then, add stackable bins and shelf risers inside cabinets to use vertical space. Install tension rods under the sink to hang spray bottles. Use over-the-door racks for pantry items. These rental-friendly hacks require no drilling and can be removed without leaving marks.
What are common mistakes to avoid in a small kitchen?
The biggest mistake is buying storage containers before decluttering. You end up organizing things you do not need. Another error is ignoring vertical space, leaving empty wall and cabinet areas unused. Also, avoid storing rarely used items at the front of cabinets. Place daily-use items at eye level and store seasonal gear on high shelves or in other rooms.
This article was written using GrandRanker