


Table of Contents
- Assess Your Corner Cabinet Space Before You Buy Anything
- Lazy Susan Alternatives for Corner Cabinets That Actually Work
- Blind Corner Cabinet Storage Solutions: Retrofitting vs. New Installation
- Organizing Pots, Pans, and Cookware in Deep Corner Storage
- Minimalist Kitchen Organization Hacks for Corner Cabinets
- Accessibility and Ergonomics for Aging-in-Place Kitchens
- Keeping Corner Cabinets Organized Long Term
- Frequently Asked Questions
Last Updated: September 27, 2026
Assess Your Corner Cabinet Space Before You Buy Anything
Most homeowners buy organizers first and measure later. That order costs money. If you want to know how to organize kitchen corner cabinets effectively, start with a tape measure, not a shopping cart.
Here's what to record before you spend a cent:
- Cabinet depth: Measure from the door frame to the back wall.
- Door width: A narrow door limits what fits through it.
- Blind corner reach: Measure how far back you can actually touch.
- Shelf height: Note the gap between each shelf.
- Plumbing or outlets: Check for pipes, disposal units, or wiring.
Lazy Susan Alternatives for Corner Cabinets That Actually Work
A lazy susan is a rotating tray that sits inside a corner cabinet and spins items toward the door. It solves the reach problem, but it wastes the square corners around the circle, typically 20 to 30 percent of usable shelf area on a standard 24-inch-deep base cabinet. That dead space is where the alternatives earn their keep.
- Diagonal (angled) corner cabinet: The door sits at a 45-degree angle across the corner. The opening is wide, the interior is a triangle, and a full round carousel fits cleanly.
- Blind corner cabinet: One door covers the cabinet, and a second cabinet's face frames the corner. Half the interior is behind a fixed panel you can't see or reach without hardware. A round carousel is the wrong tool here.
Here's how the main alternatives map to each shape:
| Option | Mechanism | Best cabinet type | Trade-off |
|---|---|---|---|
| Full-round carousel | Single rotating tray on a center post | Diagonal | Wastes square corners; post can block tall items |
| Two-tier half-round carousel | Two independent half-circles on one post | Diagonal | Upper tier hides lower tier unless it rotates clear |
| Pull-out shelf | Slides forward on side-mount or bottom-mount slides | Blind and diagonal | Needs clear door swing; slides eat 1/2 inch of width per side |
| Swing-out arm (kidney or pie-cut) | Arm pivots out of the blind zone on a hinged post | Blind | Heavy loads stress the pivot; capacity is limited |
| Sliding trays | Low-profile drawers stacked vertically | Blind and diagonal | Only works for flat, short items |
| Vertical dividers | Fixed or adjustable upright panels | Blind and diagonal | No reach improvement, you still have to lean in |
| Stacked bins | Loose bins on existing shelves | Blind and diagonal | Cheapest option; no mechanism, so deep items stay deep |
A few practical rules fall out of that table:
- Match the mechanism to the shape first. A full carousel in a blind corner leaves the back half permanently unreachable. A swing-out arm in a diagonal cabinet wastes the wide opening.
- Measure the door swing before buying pull-outs. A pull-out shelf needs the door to open at least 90 degrees and clear the adjacent cabinet or appliance. If a dishwasher or range sits next to the corner, the door may only open 70 degrees.
- Count the slide width. Side-mount slides typically consume about 1/2 inch of cabinet width per side. On a 15-inch-wide blind opening, that's meaningful.
- Check the post height. A center-post carousel needs the full interior height of the cabinet. If a shelf is fixed mid-cabinet, a two-tier carousel won't fit.
Blind Corner Cabinet Storage Solutions: Retrofitting vs. New Installation
Blind corner cabinet storage solutions fall into two camps: retrofit inserts you add to existing shelves, and full replacement systems installed during a remodel. Most guides stop at that sentence. The useful part is what happens next, which hardware, mounted how, into what cabinet material.
Retrofitting: What You're Actually Installing
A retrofit is any hardware that goes into the cabinet you already own. The three common categories:
- Slide-out shelf kits. A shelf on a pair of ball-bearing or roller slides, mounted to the cabinet floor or side walls. Side-mount slides screw into the cabinet sides; bottom-mount (undermount) slides screw into the floor and the underside of the shelf. Bottom-mount keeps the shelf full-width but requires a flat, solid floor panel.
- Swing-out arms. A hinged post mounts to the cabinet floor or a side wall, and one or two shelves pivot out of the blind zone. The pivot is the failure point, a single screw into particle board will loosen under repeated load.
- Pull-out baskets or trays on a frame. A wire or solid frame carries two or three tiers and slides as one unit. These need a clear vertical run and a solid mounting surface at the back of the cabinet.
Mounting Into Real Cabinet Materials
Cabinet construction determines whether a retrofit holds:
- Solid wood or plywood sides: Screws bite and hold. Standard wood screws work.
- Particle board or MDF: The material crumbles under load and vibration. Use threaded inserts, T-nuts, or a backing plate (a strip of 1/2-inch plywood glued and screwed to the cabinet wall) to spread the load.
- Metal cabinet boxes: Require self-tapping screws or rivet nuts. Do not use wood screws.
A common pattern is that the mount fails before the slide does. A slide rated for 50 pounds can still pull out of soft cabinet walls if the screws only have 3/8 inch of material to grip.
Weight Capacity: Read the Label, Then Halve It
Manufacturers publish a load rating per pair of slides, measured with the load centered and the slide fully extended. In a real corner cabinet, the load is rarely centered and the slide is often extended while loaded. Most practitioners find that staying at or below half the rated capacity keeps slides smooth and mounts tight.
A few rules keep hardware working:
- Spread heavy items across the widest part of the shelf.
- Keep the heaviest pots closest to the cabinet frame, not at the front edge.
- Check the mount screws every few months, a loose screw is the first sign of overload.
- Never exceed the rated load printed on the box.
New Installation: When It's Worth It
Full replacement systems, custom pull-out units, corner carousels built into a new cabinet box, or a complete blind-corner conversion, only make sense when you're already replacing cabinets or rebuilding the layout. The cost is in the cabinet, not the hardware. If the cabinet box stays, retrofit.
| Approach | Best For | Effort | Reversible |
|---|---|---|---|
| Retrofit inserts | Renters, quick fixes | Low | Yes |
| Pull-out shelf kits | Standard base cabinets | Medium | Yes |
| Full replacement | Renovations | High | No |
| Custom carpentry | Odd shapes, high budgets | High | No |
The Blind-Corner-Specific Catch
In a blind corner, half the interior sits behind a fixed panel. Any retrofit that relies on reaching into that zone will fail in daily use. The hardware has to bring the contents out, a swing-out arm, a pull-out frame, or a slide that extends past the door frame. A shelf that only slides partway leaves the back items exactly where they were.
Sinkelle PanNest Adjustable Pot →
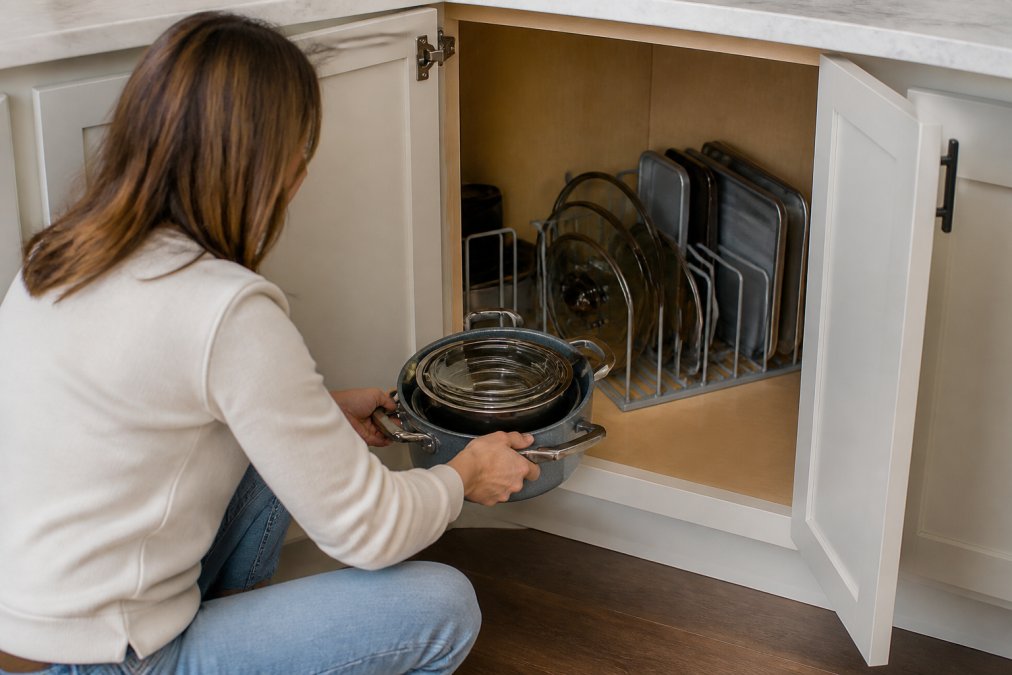
Organizing Pots, Pans, and Cookware in Deep Corner Storage
Deep corner storage swallows cookware. The fix is to stop stacking and start standing items upright.
Minimalist Kitchen Organization Hacks for Corner Cabinets
Minimalist kitchen organization hacks come down to one idea: less stuff, better placed. A corner cabinet holds more when you stop treating it as a dumping ground.
Try these:
- Keep only what you use weekly in the corner.
- Move seasonal or rare items to high shelves elsewhere.
- Group by task, not by type.
- Label bins so everyone puts things back.
- Empty the whole cabinet once a season.
Bins, Baskets, and Cabinet Dividers That Keep Their Shape
Cheap bins collapse. Look for rigid sides, a flat base, and a material that won't warp when wet.
- Rigid plastic bins: Easy to wipe, hold their shape.
- Wire baskets: Let air flow, good for produce.
- Bamboo dividers: Warm look, sturdy for dry goods.
- Metal frames: Best for heavy items.
Accessibility and Ergonomics for Aging-in-Place Kitchens
Corner cabinets are the hardest spot to reach, which makes them a problem for anyone with limited mobility. Good design fixes this.
For aging-in-place kitchens, prioritize:
- Pull-out shelves over fixed ones.
- Lighter loads per shelf.
- Clear, wide door openings.
- Items used daily at waist height.
Keeping Corner Cabinets Organized Long Term
Organization fails without a maintenance habit. The corner cabinet is the first place clutter returns.
A simple routine prevents the slide back:
- Do a two-minute tidy every week.
- Do a full clear-out every season.
- Return items to their labeled spot daily.
- Remove anything you haven't used in a year.
Frequently Asked Questions
How do I organize a corner kitchen cabinet without a lazy susan?
Skip the turntable and use pull-out shelves or a two-tier sliding organizer instead. Pull-out trays bring the back of the cabinet to you, so you are not reaching into dead space. For pots and pans, an adjustable rack like the Sinkelle PanNest Adjustable Pot Organizer ($38.99) holds cookware and lids upright in carbon steel, which frees up the full cabinet depth. Add clear bins for smaller items and keep the heaviest pieces on the bottom tier.
What are the best blind corner cabinet storage solutions?
The three that work reliably are pull-out shelves, a corner carousel, and a two-tier sliding organizer. Pull-out shelves suit heavy cookware because the frame carries the load. For under-sink and lower corner cabinets, the Sinkelle 2 SlideNest Organizer ($55.99) uses a metal frame with two pull-out tiers, so you can slide the whole unit forward instead of crawling into a blind corner.
Are corner cabinets still in style?
Yes. Corner cabinets remain standard in most kitchen layouts because they use floor space that would otherwise be wasted, and the current trend is to make them work harder rather than remove them. Designers now favor pull-out trays, slim metal racks, and bamboo inserts over fixed shelves, since these let you see and reach everything. The goal is a corner cabinet that reads as clean and intentional rather than a place where items disappear.
How do I stop a corner cabinet from becoming cluttered again?
Give every item a fixed home and cap the quantity. Group by use, not by category: baking trays together, lids together, small appliances together. Use cabinet dividers or stacking racks so nothing piles up. Once a month, pull everything out, wipe the shelf, and return only what you used. A hanging organizer like the Sinkelle CabinetFlow Hanging Organizer ($44.99) keeps frequently used items off the counter, which reduces the odds of things getting shoved into the corner.
Corner cabinets stay messy because reaching into them is awkward, and awkward spaces get avoided. SinkElle builds minimalist, Scandinavian-inspired organizers that make those spaces work, with waterproof materials and tool-free installation that takes minutes. Start with the PanNest for cookware, add the SlideNest for under-sink storage, and let the CabinetFlow turn dead cabinet space into usable room. Shop now at SinkElle and give every corner of your kitchen a purpose.