


Table of Contents
- Why a Tool-Free Kitchen Sink Organizer Transforms Your Space
- How to Organize Kitchen Sink Area: Installation Methods That Actually Work
- Stainless Steel vs. Plastic: Which Material Lasts Longer
- Under Sink Storage Solutions for Tight Spaces
- Adhesive Sink Caddy: When It Works and When It Doesn't
- Preventing Mold and Maintaining Hygiene Long-Term
- Organizing Sponges, Brushes, and Soap: The Complete System
- Conclusion
Last Updated: August 13, 2026
Why a Tool-Free Kitchen Sink Organizer Transforms Your Space
A cluttered sink area drains your morning routine and makes even a clean kitchen feel chaotic. The difference between a functional sink zone and one that frustrates you daily comes down to one thing: whether your cleaning supplies have a designated home. A tool-free kitchen sink organizer solves this without requiring drilling, plumbing calls, or permanent changes.
At SinkElle, we've watched homeowners transform their kitchens in minutes using products designed for renters, apartment dwellers, and anyone who refuses to damage their walls. Most kitchen organization systems fail because they ignore how people actually use their sink. You need your sponge, soap, and brushes within arm's reach, drying properly so they don't smell, and looking intentional rather than cluttered.
How to Organize Kitchen Sink Area: Installation Methods That Actually Work
Your installation method determines whether your organizer stays put or becomes a frustrating wobble-fest. Two proven approaches dominate: suction cups and over-the-faucet mounts.
Suction Cup Installation for Renters
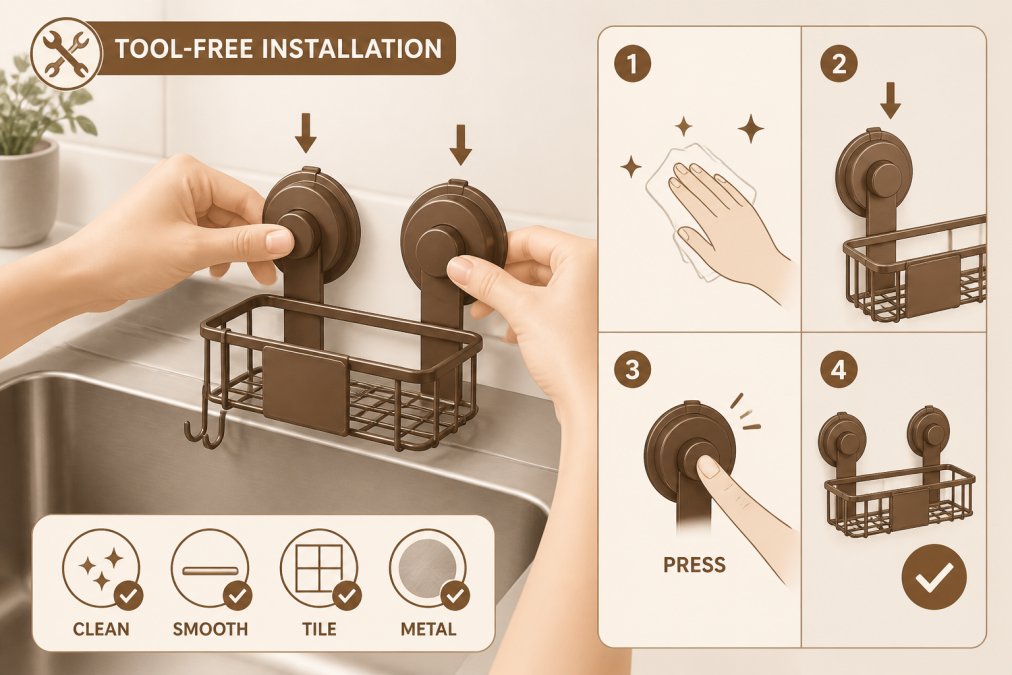
Suction cup organizers rest on the sink rim, held by air pressure alone. Success depends on surface preparation: your sink edge must be clean, dry, and smooth. Clean your sink rim with vinegar, dry it completely with a lint-free cloth, then press the suction cups firmly for a full 10 seconds. If your sink has a textured or curved edge, suction cups won't grip reliably, use the over-the-faucet option instead.
The SinkElle FlowRack Pro uses this method and includes a drainage system that slopes water back into the sink, so your sponges don't sit in puddles.

Over-the-Faucet Mounting Without Drilling
Over-the-faucet organizers clamp to your existing faucet spout, using the faucet itself as the anchor point. Installation takes under two minutes: loosen the clamp, slide it over your faucet, tighten it snug. Water drains directly back into the sink, and you get vertical storage instead of horizontal clutter. This method works best with single-spout faucets; test weight limits with pull-down or pull-out faucets, as some aren't designed to support hanging organizers.
Stainless Steel vs. Plastic: Which Material Lasts Longer
Material choice determines whether your organizer lasts two years or ten. Understanding how each material fails under sustained water exposure is key to making a choice you won't regret.
How Plastic Degrades in Wet Environments
Plastic organizers absorb water over time, especially at seams and mounting points. After 4-6 months of daily sink use, suction cups grip less effectively or clamps become wobbly. Ultraviolet light accelerates this process, plastic organizers fade and become brittle within 12-18 months in direct sunlight. The real failure point is the adhesive or seal at mounting locations. Plastic expands and contracts with temperature changes, breaking adhesive bonds and loosening mechanical clamps. By month 24, most plastic organizers either slip constantly or require re-tightening every few weeks.
Stainless Steel: Corrosion and Coating Failure
Stainless steel resists rust through a passive oxide layer, but chloride exposure (from tap water minerals) can pit this layer. In high-chloride environments, rust spots may emerge after 18-24 months. The coating matters enormously, stainless steel organizers are often finished with powder coat or lacquer to prevent water spotting. If scratched or chipped, water reaches the underlying steel and corrosion begins at that point.
High-grade stainless steel (304 or 316 alloy) resists corrosion far better than lower grades (430 or 201 alloy). 304 stainless withstands 5-10 years of daily water exposure, while 430-grade may show corrosion within 2-3 years. Check the product specification sheet to confirm alloy grade. Unlike plastic, stainless steel doesn't lose structural integrity from water absorption, it remains rigid and maintains grip strength indefinitely.
Real-World Durability Comparison
Plastic organizers typically function reliably for 18-24 months before replacement is needed. Stainless steel organizers function reliably for 5-8 years, with cosmetic maintenance (occasional polishing) required after year 3. A $25 plastic organizer replaced every 2 years costs $12.50 per year. A $60 stainless steel organizer lasting 8 years costs $7.50 per year. Over a decade, stainless steel saves money and eliminates repeated replacements.
The SinkElle FlowRack Pro uses 304-grade stainless steel with a powder-coat finish engineered for wet environments. It won't degrade, discolor, or warp.

Under Sink Storage Solutions for Tight Spaces
Your under-sink area is wasted space in most kitchens, but only if you don't measure it correctly. Before buying any under-sink organizer, you need a compatibility map specific to your setup.
Measuring Your Under-Sink Space: The Right Way
Under-sink dimensions matter more than you'd think. Measure three dimensions:
Width: Measure the interior width of the cabinet opening, then subtract 1 inch on each side for clearance. If your cabinet is 36 inches wide, your usable width is roughly 34 inches.
Depth: Measure from the back wall of the cabinet to the front edge of the sink basin. In most kitchens, the sink basin intrudes 6-8 inches into the cabinet depth. If your cabinet is 24 inches deep and the basin intrudes 7 inches, you have 17 inches of usable depth.

Height: Measure from the cabinet floor to the underside of the sink basin. This is typically 12-16 inches. Measure at multiple points because the sink basin may not be perfectly level.
Most under-sink organizers are designed for 30-34 inches of width, 12-16 inches of depth, and 10-14 inches of height. If your measurements fall outside these ranges, you'll need a custom solution.
Sink Type Compatibility: Where Most Guides Fail
Your sink type determines which organizers will work.
Standard drop-in sinks have a rim on top of the countertop with the drain trap hanging straight down from the center. This is the easiest configuration for under-sink storage. You typically have 8-10 inches of clearance on either side of the trap.
Undermount sinks have no rim, so the basin intrudes deeper into the cabinet. The drain trap is still centered, but the basin takes up more usable depth. Undermount sinks reduce available under-sink storage by 2-3 inches compared to drop-in sinks.
Farmhouse sinks have a deep basin extending forward with the drain trap offset to one side, not centered. This creates asymmetrical under-sink space. The side with the trap has minimal clearance (4-6 inches), while the opposite side may have 12+ inches. Standard organizers won't work.
Double-basin sinks have two separate drain traps, dividing your under-sink space into three zones. The center zone (between traps) is often only 6-8 inches wide and not usable for most organizers.
Corner sinks have the drain trap positioned at an angle, creating triangular or L-shaped space. Pull-out organizers designed for straight cabinets will bind or jam.
Garbage Disposal Clearance
If you have a garbage disposal, it occupies significant space and generates heat. Most disposals are 4-5 inches in diameter and extend 8-12 inches below the drain. You cannot store anything directly under or immediately adjacent to a disposal because heat can warp plastic organizers, vibration can shake organizers loose, and you need access for maintenance. In single-basin sinks with a disposal, you have roughly 8-10 inches of usable space to the side of the disposal, not underneath it.
Practical Under-Sink Organization by Sink Type
For drop-in sinks: Pull-out organizers work well. Choose a unit that's 2 inches shorter than your measured depth to ensure smooth sliding.
For undermount sinks: Reduce your expected depth by 2-3 inches. Choose shallow pull-out units (12-14 inches deep) or rely primarily on adhesive-backed wall organizers.
For farmhouse sinks: Measure the clearance on both sides of the offset trap. If one side has 10+ inches, place a narrow pull-out organizer there. Use adhesive-backed organizers on the opposite side.
For double-basin sinks: Use adhesive-backed organizers on cabinet walls and narrow, modular units (3-4 inches wide) in the side zones.
For corner sinks: Use corner-specific pull-out units if available, or create a custom solution with adhesive-backed organizers positioned around the trap.
If your under-sink space is severely constrained (less than 12 inches of usable depth or height), skip under-sink storage entirely and focus on countertop and over-the-faucet solutions instead.
Adhesive Sink Caddy: When It Works and When It Doesn't
Adhesive caddies stick directly to your sink basin or cabinet wall using industrial-strength tape. Installation is instant, no tools required. But adhesive only works in specific situations.
Adhesive works when your sink surface is clean, dry, and smooth. Stainless steel, ceramic, and painted surfaces hold adhesive well. It fails on textured finishes, non-stick coatings, or surfaces with soap residue. The real limitation is permanence. Adhesive organizers are designed to stay put. Removing them often damages the surface underneath. If you rent, this is a deal-breaker. For renters and anyone who values flexibility, suction cups or over-the-faucet mounts are better choices.
Preventing Mold and Maintaining Hygiene Long-Term
Mold and bacteria thrive in wet, dark environments. Your sponge is a perfect incubator if water pools around it or if it stays damp for hours. An organizer that drains properly is half the battle; the other half is maintenance.
Look for sloped trays that channel water back into the sink instead of creating puddles. Avoid designs with crevices or hard-to-reach corners where moisture accumulates. Clean your organizer weekly: rinse it with hot water, wipe it dry, and check for standing water. Replace your sponge every 7-10 days, sooner if it develops an odor.
The SinkElle DryFlow Splash Mat and AquaShield Faucet Guard work alongside your organizer to keep the entire sink area dry. Less standing water means less mold risk.
Organizing Sponges, Brushes, and Soap: The Complete System
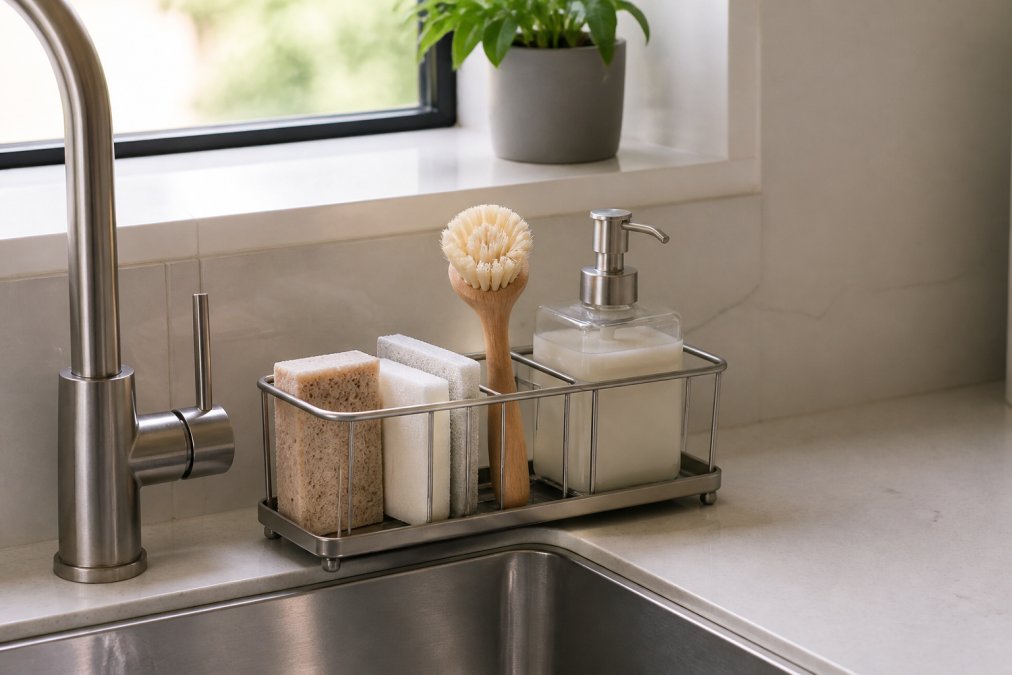
A complete sink organization system handles everything you actually use near your sink: sponges, dish brushes, soap dispensers, and dishcloths. Separating items by function keeps your sink area functional and intentional.
Sponges need air circulation to dry. Store them upright or on a slope, never flat in a puddle. Dish brushes work best when bristles-up in a holder that keeps them off wet surfaces. Soap dispensers should be accessible but not in the way, a corner position or side mount keeps soap at hand without blocking your sink basin. Dishcloths and towels should hang, not pile, so they dry between uses.
The Sink Organization Bundle from SinkElle combines the FlowRack Pro organizer with the DryStone Quick-Dry Kitchen Mat and splash protection, creating a complete system that handles sponges, brushes, soap, and water management in one coordinated setup.
Conclusion
A tool-free kitchen sink organizer isn't a luxury, it's the fastest way to reclaim your kitchen and eliminate daily friction. The right organizer fits your space, installs without damage, and lasts years without degrading. Start with the SinkElle FlowRack Pro if you need immediate sponge and brush organization, or choose the Sink Organization Bundle if you want complete sink-area control with splash protection and quick-dry mats included. Both solutions install in minutes, require no tools, and transform how your kitchen functions every single day. Shop Now and experience the difference a designed sink area makes.
Frequently Asked Questions
What can I put under my kitchen sink to organize things?
Under-sink storage works best for items you don't access daily. Use waterproof containers, pull-out trays, or modular organizers to maximize the space around plumbing. Avoid storing anything directly on the sink basin floor, where moisture collects. For rental apartments, adhesive-backed organizers and removable shelving units preserve your deposit while keeping supplies accessible and dry.
How do I choose the right size sink caddy?
Measure your sink's width and depth before ordering. Standard kitchen sinks range from 30 to 48 inches wide. Check whether your sink has a single or double basin and note any obstacles like garbage disposals or faucet handles. A tool-free organizer should rest stably on the rim or divider without wobbling. Compact designs work best for apartment kitchens; larger models suit open layouts with extra counter real estate.
Are suction cup sink organizers reliable?
Suction cups work well on smooth, non-porous surfaces like stainless steel sinks and ceramic countertops. They fail on textured, porous, or curved surfaces. Over time, suction cups lose grip due to mineral buildup and temperature changes. Clean them monthly with vinegar, and replace them annually. For permanent solutions in owned homes, over-the-faucet or adhesive-backed options provide more stability. Renters benefit from suction cups because they leave no marks.
How do I prevent mold in a tool-free sink organizer?
Mold thrives in wet, dark spaces with poor airflow. Choose organizers with angled drainage systems and ventilation holes. Sponges and brushes dry faster when elevated off surfaces, reducing moisture pooling. Empty the caddy weekly, wipe it dry, and allow air to circulate underneath. Stainless steel resists mold better than plastic. If mold appears, soak the organizer in a 1:1 white vinegar and water solution for 30 minutes, then rinse and air-dry completely.
This article was written using GrandRanker