


Table of Contents
- Start With a Clean Slate: Declutter Your Sink Area
- Measure Your Cabinet Space: Height, Width, and Depth
- Under-Sink Storage Ideas for Pipes and Plumbing
- Under-Sink Organizer for Pipes: What Actually Works
- Small Kitchen Sink Organization: Renter-Friendly Solutions
- How to Organize Under the Kitchen Sink for the Long Haul
- Frequently Asked Questions
Last Updated: October 8, 2026
Start With a Clean Slate: Declutter Your Sink Area
The fastest way to maximize sink area space is to remove everything from the counter and cabinet first, then decide what earns a spot back. A clear surface shows you exactly how much room you have to work with.
Pull every bottle, sponge, and scrubber out of the cabinet. Group them on the floor or a nearby table.
Then sort into three piles:
- Keep - items you use daily or weekly
- Move - things that belong in the bathroom, laundry, or pantry
- Toss - dried-out cleaners, cracked bottles, mystery duplicates
Most sink areas hold two or three half-empty spray bottles doing the same job. Pick one and recycle the rest.
Wipe down the cabinet floor and walls while it sits empty. This is also your first chance to spot moisture damage.
Measure Your Cabinet Space: Height, Width, and Depth
Measuring is the step most people skip, and it is the reason so many organizers end up returned. The goal is not just to collect numbers, it is to turn those numbers into fit rules you can apply in the store aisle.
Grab a tape measure and a notepad. For every zone, record height, width, and depth, then write down the clearance number next to each one.
Under-sink storage is the hardest zone to measure because pipes cut into it. Here is what to record:
- Height from cabinet floor to the lowest point of the sink basin, then subtract 1 inch for the organizer's own thickness
- Width at the widest point, ignoring the door frame, then subtract 1 inch total for side clearance on a pull-out
- Depth from the back wall to the inside of the door, then subtract 2 inches if you want a door rack to clear the shelves
- Plumbing clearance around the drain pipe and garbage disposal, measure the disposal unit separately, since it usually hangs lower than the drain and sets the real ceiling
Counter space needs two numbers, not one. Measure the strip between the sink edge and the wall, and measure the height from counter to the bottom of the upper cabinets. A caddy that is 4 inches deep fits a 5-inch strip; a 6-inch caddy does not, no matter how good the reviews are.
Here is the fit-rule checklist to keep in your pocket while you shop:
- Tiered shelf: needs 1 inch of clearance above the tallest item on the top tier, or the door will not close
- Pull-out drawer: needs 1 inch of side clearance and a flat cabinet floor; a raised cabinet lip will jam it
- Stackable bin: needs 2 inches of headroom above the stack so you can lift the top bin out
- Door-hung rack: needs 2 inches of depth clearance from the shelf front to the door back, plus a hinge that can take the added weight
- Sliding tray: needs a smooth floor and at least 1 inch of front-to-back play so it does not bind on the door frame
A measurement-based approach beats guessing every time. Write the numbers on a sticky note, photograph the open cabinet with your phone, and keep both with you. When a product listing gives outside dimensions, compare them to your clearance numbers, not to the raw cabinet size. A bin that is 2 inches too tall will not fit, no matter how good it looks online.
Under-Sink Storage Ideas for Pipes and Plumbing
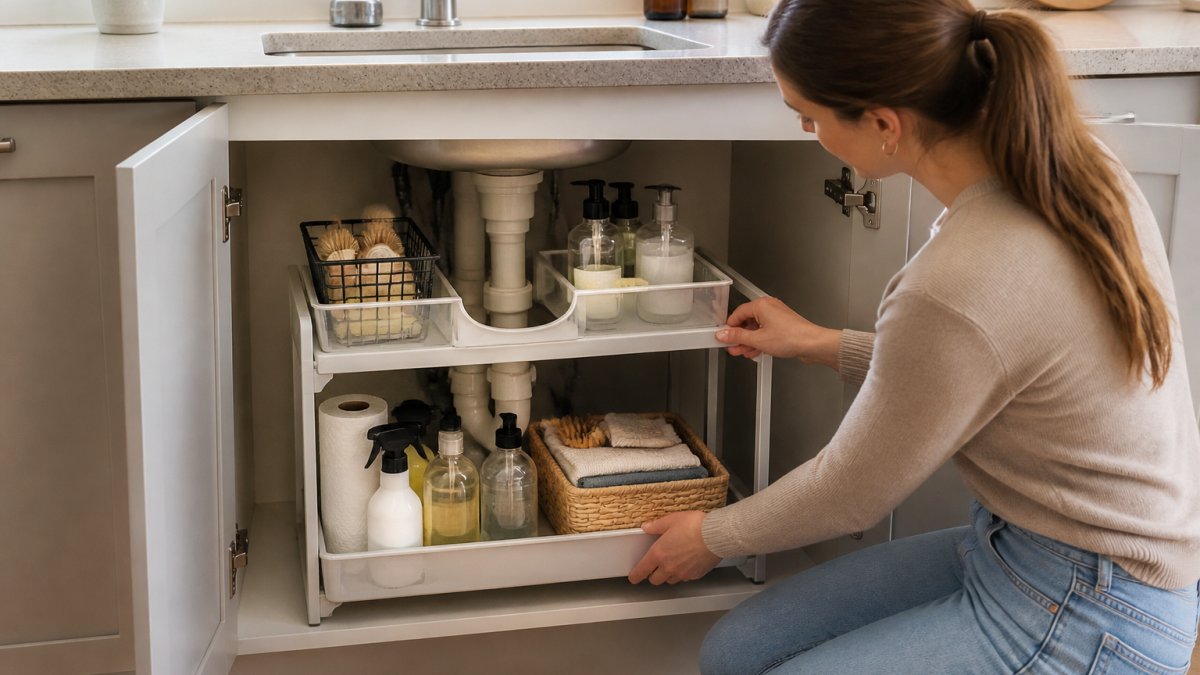
The space around a curved pipe is not wasted. It just needs a layout that works around the plumbing instead of fighting it.
Start by mapping where the pipes sit. Most sinks have a drain in the center and a disposal off to one side. That leaves two usable pockets: the left and right corners.
Here is how to use each one:
- Corner pockets: stack cleaning supplies on a two-tiered organizer
- Front strip: slide a shallow tray for sponges and cloths
- Door back: hang a slim rack for brushes and gloves
- Above the pipe: leave clear, or add a low basket for light items
Group supplies by job, not by brand. All the bathroom cleaners together. All the dish items together. This makes the cabinet easier to reset and easier to shop from.
Small kitchen sink organization comes down to one rule: keep the frequently used items at the front and the once-a-month items at the back.
Under-Sink Organizer for Pipes: What Actually Works
The best under-sink organizer for pipes is one with an open back or a split-tier design, so it can sit around the drain instead of on top of it. Solid boxes almost never fit.
Here is how the common options compare:
| Option | Best For | Watch Out For |
|---|---|---|
| Two-tiered organizer | Wrapping around a center pipe | Must clear the disposal height |
| Pull-out drawer | Deep cabinets with a clear front | Needs 2 cm of side clearance |
| Stackable bins | Odd-shaped corners | Hard to reach the back bin |
| Sliding tray | Sponges and small tools | Only holds light items |
| Door-hung rack | Brushes and cloths | Adds weight to the hinges |
For a cabinet with a garbage disposal, measure the disposal unit first. It usually hangs lower than the drain pipe, so it sets the real height limit.
Sinkelle ExtendDry Retractable Sink Rack →
If the plumbing angles are strange, skip the big organizer and use two small bins instead. They flex around the pipes better than one large unit.
Small Kitchen Sink Organization: Renter-Friendly Solutions
Renters face a real limit: no drilling, no new plumbing, and no permanent changes. The good news is that the best solutions for a small kitchen sink are also the ones that lift right out, and they can be adapted to almost any sink and cabinet configuration.
Start with the counter. A sink area space plan for a rental usually means adding vertical storage, not more furniture.
Try these no-damage options:
- Over-the-sink rack: adds drying space without touching the wall
- Countertop caddy: keeps soap and sponges in one spot
- Adhesive hooks: hold light tools, remove cleanly
- Freestanding shelves: sit on the counter, no mounting
- Sink-side mat: catches drips and protects the surface
Tool-free installation matters here. Look for products that sit, hang, or rest in place with no drilling, which keeps a lease safe and makes moving day easier.

If a splash guard or faucet mat uses suction or a weighted base, check it holds before you trust it with water.
Adapt the Layout to Your Sink and Cabinet Type
The same no-drill kit works differently depending on what is under the sink. Match the layout to your configuration:
- Pedestal sink: there is no cabinet, so all storage moves to the counter and the wall. Use a freestanding shelf beside the sink and a caddy on the counter. Keep the pedestal base clear so you can wipe it down.
- Deep sink with a center drain: the drain splits the cabinet into two usable pockets. Put a narrow bin in each pocket and leave the center clear for the pipe.
- Garbage disposal: the disposal hangs lower than the drain and sets the height limit. Measure it first, then choose a low-profile tray or a split-tier organizer that straddles it.
- Narrow cabinet: skip the wide pull-out and use two stacked bins instead. They flex around odd angles better than one large unit.
- Shallow cabinet: a door-hung rack adds depth without stealing floor space. Keep the contents light so the hinges are not strained.
For a rental, the rule is simple: if it cannot be lifted out in one motion, it is not renter-friendly. Choose organizers that come out whole, so you can clean under them and take them with you when you move.
How to Organize Under the Kitchen Sink for the Long Haul
A neat cabinet fails for one reason: no reset routine. The fix is small and repeatable.
Follow this five-step method:
- Empty the cabinet completely, once a season
- Wipe the floor and walls, and check for leaks
- Sort supplies and toss anything expired
- Return items to their assigned zone
- Note what you are low on before you close the door
Keep chemicals in their original labeled containers (the EPA). Store them away from food, and never mix cleaning products together. The EPA guidance on safe household chemical storage explains why sealed, labeled storage matters in a small space.
Moisture is the other long-term threat. A slow drip under the sink can warp shelves and grow mold before you notice. Check the pipes every few months, and use waterproof organizers so a small leak does not ruin everything.
For the counter, a quick-dry mat keeps water from pooling around the faucet. Less standing water means less scrubbing later.

The CDC guidance on preventing mold after water damage recommends drying wet surfaces within 24 to 48 hours. A sloped splash mat does that job automatically.
Frequently Asked Questions
How do I organize under the kitchen sink with a garbage disposal?
Start by measuring the clearance around your disposal unit. Use a two-tiered organizer or stackable bins that fit on either side of the disposal, and keep cleaning supplies in a caddy that lifts out easily. Avoid storing anything directly on top of the disposal, as vibration can shift items. A pull-out drawer on one side gives you access without reaching past the pipes.
What are the best under-sink storage ideas for small spaces?
Focus on vertical space with tiered shelves and stackable bins. Use the cabinet door for hanging storage, and choose slim containers that fit around plumbing. A retractable sink rack over the basin frees up counter space, while a compact caddy keeps sponges and soap within reach. Group items by frequency of use so daily essentials stay in front.
How can I keep my sink area clutter-free long-term?
Set a weekly reset routine: clear the counter, wipe surfaces, and return items to their designated spots. Use a caddy for cleaning tools and a splash mat to prevent water buildup. Only keep frequently used items on the counter, and store the rest in labeled bins. This five-minute habit prevents the gradual pile-up that makes sink areas feel chaotic.
What should I put under my kitchen sink to protect against leaks?
Line the cabinet floor with a waterproof mat or shelf liner. Use waterproof organizers and bins to contain bottles, and keep chemical products in a separate bin away from food-related items. Check pipes monthly for drips, and avoid storing paper goods directly under plumbing. A moisture-resistant mat catches small leaks before they damage the cabinet base.
A cluttered sink area is a daily friction point, and it rarely fixes itself. SinkElle builds minimalist, Scandinavian-inspired organizers that solve it with waterproof materials and no tools required. Our ExtendDry Retractable Sink Rack adds drying space over the sink, the FlexiDrain Sink Caddy keeps sponges and soap in reach, and the DryFlow Splash Mat stops water before it spreads. Shop now and turn your sink area into a space that stays clean on its own.