


Table of Contents
- Step 1: Declutter and Purge Expired Items
- Step 2: Measure Cabinet Dimensions and Assess Your Space
- Step 3: Categorize Kitchen Items by Zone
- Kitchen Cabinet Organization Ideas for Small Spaces
- Step 4: Choose the Right Organizers and Storage Solutions
- Best Kitchen Cabinet Organizers for Sink Areas
- Non-Permanent Kitchen Organization for Renters
- Step 5: Optimize Vertical Space and Placement
- Frequently Asked Questions
Last Updated: September 1, 2026
Step 1: Declutter and Purge Expired Items
The first step to organize kitchen cabinets is honest assessment: what stays and what goes. Many homeowners skip this phase and jump straight to buying organizers, only to find cluttered cabinets again within months. You can't organize what you don't need.
Pull everything out of your cabinets, one section at a time. Check expiration dates on spices, baking ingredients, and canned goods. Expired items compromise food safety (the FDA). Medications, old vitamins, and supplements belong in the trash or at a proper disposal facility, never back in your cabinets (the FDA).
Separate items into three piles: keep, donate, and discard. Be ruthless about duplicates. If you own three spatulas but use one, the other two waste valuable space. Kitchen gadgets untouched in a year are candidates for donation. Donate items in good condition to local shelters, food banks, or community organizations.
This purging phase reveals your actual inventory and storage needs. You'll discover which items you genuinely use daily versus those taking up space. This insight becomes crucial when you measure and plan your zones in the next step.
Step 2: Measure Cabinet Dimensions and Assess Your Space
Before purchasing a single organizer, measure your cabinet dimensions precisely. Record the width, depth, and height of each cabinet you plan to organize. Note any obstacles: plumbing under the sink, garbage disposal units, or uneven shelves that limit storage options.
Understanding your cabinet depth is especially important. Standard kitchen cabinets are typically 12 inches deep, but older homes sometimes have shallower cabinets (nkba.org). This determines what depth of organizers will fit without blocking door closure.
Check your shelf spacing. Many cabinets have fixed shelves, while others feature adjustable shelves with holes for repositioning. Adjustable shelves give you flexibility to create zones for different item heights.
Take photos of your cabinet interiors with measurements noted. This becomes your reference when shopping for solutions. Many people purchase organizers without accurate measurements, only to discover they don't fit. A quick measurement session saves frustration and returns later.
Pay attention to your kitchen triangle, the workflow path between your sink, stove, and refrigerator. Items used most frequently should be stored closest to where you use them. This efficiency principle drives better cabinet organization than aesthetics alone.
Step 3: Categorize Kitchen Items by Zone
Creating zones transforms chaotic cabinets into functional spaces. A zone is a designated area for a specific category of items. Instead of randomly placing cookware, bakeware, and utensils wherever they fit, you assign each category its own cabinet or shelf section.
Start with your most-used items. Everyday dishes, glasses, and bowls should occupy the cabinet nearest your dishwasher or sink for efficient unloading. Cooking utensils belong near your stove. Baking supplies, flour, sugar, baking powder, measuring cups, should cluster together, separate from everyday cooking items.
Group by frequency of use. Daily-use items go at eye level or slightly below. Weekly items can occupy middle shelves. Seasonal or occasional-use items belong on higher or lower shelves. This creates a natural workflow that reduces time spent searching.
Consider your household's actual cooking patterns. If you bake weekly, your baking zone needs prime real estate. If you rarely bake, that zone can occupy a less accessible shelf.
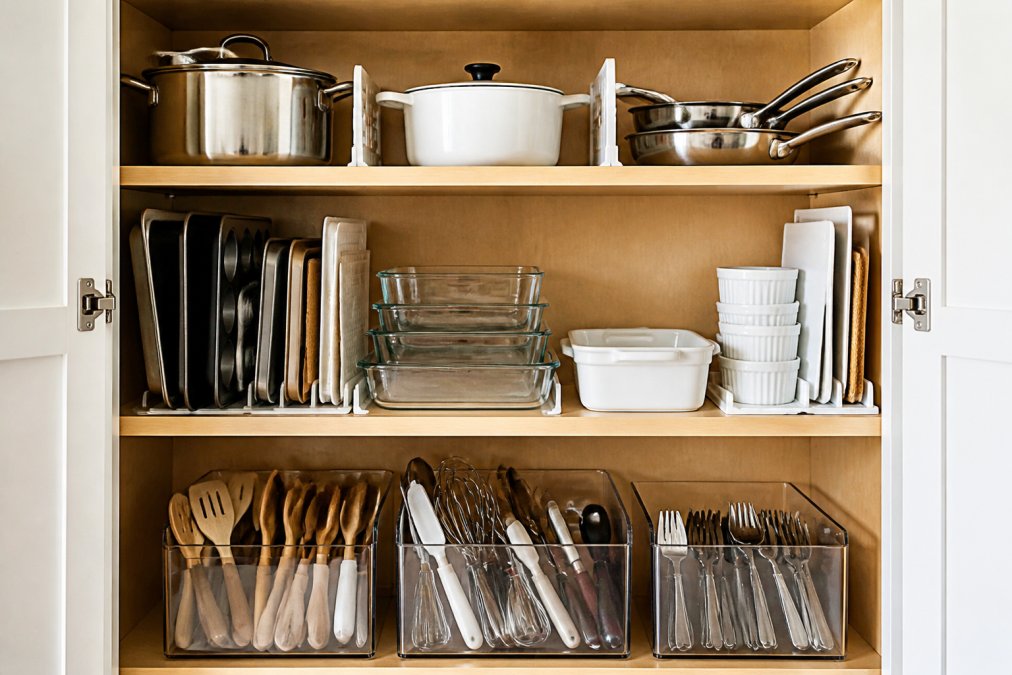
Use drawer dividers and shelf liners to define boundaries within zones. Visual separation prevents items from creeping into neighboring spaces. Even without purchasing new organizers, you can create zones simply by grouping items and using existing containers as dividers.
Document your zones before purchasing organizers. Sketch a simple diagram showing which cabinet will hold what category. This planning prevents impulse purchases of organizers that don't match your actual needs.
Kitchen Cabinet Organization Ideas for Small Spaces
Small kitchen spaces demand strategic thinking. Every inch matters when you're working with limited cabinet real estate. The good news: small kitchens often have fewer items to organize, making the process faster once you commit to it.
Vertical storage becomes your best friend in compact kitchens. Install shelf risers or stackable organizers that use the full height of your cabinets. A single shelf becomes two usable levels when you add a riser, effectively doubling your storage capacity.
Under-sink storage presents both challenges and opportunities. The area beneath your sink is often wasted because of plumbing obstacles. However, tiered shelf organizers fit around pipes, and hanging organizers maximize the inside of cabinet doors.
Corner cabinets are notorious space-wasters. Lazy Susans and rotating organizers solve this problem by making corner items accessible without reaching to the back. These rotating solutions work particularly well for spices, oils, and condiments.
Door-mounted organizers add storage without consuming shelf space. Over-the-door racks hold cutting boards, baking sheets, and frequently-used items, freeing up internal shelf space for larger cookware.

SinkElle's approach to small-space organization focuses on maximizing the sink area specifically. Strategic organization in this zone creates cascading benefits throughout your entire kitchen.
Measure twice before purchasing organizers for small spaces. A poorly-chosen organizer in a compact kitchen creates more problems than it solves by blocking access to items behind it.
Step 4: Choose the Right Organizers and Storage Solutions
Not all organizers are created equal. Your choice depends on your cabinet dimensions, the items you're storing, and your lifestyle.
Consider material durability. Plastic organizers are affordable but may warp or crack under weight. Metal organizers provide strength and longevity. Bamboo organizers add aesthetic appeal while offering solid support. For areas prone to moisture, like under-sink cabinets, waterproof materials prevent mold and deterioration.
Stackable containers work well for pantry items, baking supplies, and dry goods. Clear containers let you see contents at a glance. Stackable design maximizes vertical space without requiring additional shelf space.
Drawer dividers and utensil organizers bring order to junk drawers. Rather than tossing everything into one drawer, dividers create designated spaces for spatulas, wooden spoons, measuring spoons, and cooking utensils.
For cookware storage, tiered organizers prevent the frustrating situation where retrieving one pan requires moving five others. The Sinkelle PanNest Adjustable Pot Organizer holds pots, pans, lids, and baking trays in organized tiers, keeping frequently-used cookware accessible while maximizing cabinet space. At $38.99, it transforms chaotic cookware storage into an efficient system.

Hanging organizers work particularly well for items you use daily. The Sinkelle CabinetFlow Hanging Organizer mounts beneath cabinets to hold cutting boards, baking sheets, and frequently-accessed items without consuming shelf space. At $44.99, it creates additional storage in areas that would otherwise remain empty.
For multi-level organization, tiered shelf organizers double your usable space. The Sinkelle 2 SlideNest Organizer provides two tiers for under-sink storage, keeping cleaning supplies and dish soaps organized while accommodating plumbing obstacles. Priced at $55.99, it transforms the typically chaotic under-sink area into functional storage.
Test organizers before committing. If possible, borrow a friend's organizer or purchase from retailers with generous return policies.
Best Kitchen Cabinet Organizers for Sink Areas
The under-sink area presents unique challenges: plumbing, moisture, and limited vertical space. Most people store cleaning supplies, dish soap, and trash cans here, creating a cluttered mess. Strategic organization transforms this zone into a functional utility area.
Tiered shelf organizers specifically designed for under-sink storage accommodate pipes while maximizing usable space. These organizers sit above plumbing and create two storage levels where previously only one existed.
Sliding organizers work better than fixed shelves in under-sink cabinets because they allow you to pull items forward without disturbing plumbing.
Waterproof materials are non-negotiable for sink-area storage. Moisture from pipe condensation, dish-washing splashes, and occasional leaks will eventually damage standard organizers. Stainless steel and sealed wood resist water damage far better than untreated materials.
The Sinkelle 2 SlideNest Organizer specifically addresses sink-area challenges. Its metal construction resists moisture, and the sliding design accommodates typical under-sink plumbing configurations. At $55.99, it's a targeted solution rather than a generic organizer adapted to this difficult space.

Door-mounted organizers maximize the inside of under-sink cabinet doors. These hanging racks hold spray bottles, cloths, and frequently-used cleaning items, freeing up shelf space for larger items.
Consider a pull-out trash bin for your under-sink area. This keeps garbage contained and out of sight while remaining easily accessible. Many pull-out designs include recycling compartments, supporting efficient waste management directly at your sink zone.
Label everything in your sink-area organizer. Clear labeling prevents forgotten items and makes it obvious when supplies run low.
Non-Permanent Kitchen Organization for Renters
Renters face unique constraints: you can't drill holes, install permanent shelving, or modify cabinets without risking your security deposit. Yet you still deserve an organized kitchen. The solution lies in non-permanent, tool-free installation methods.
Adhesive shelf liners create defined spaces without permanent installation. These liners stick to existing shelves and can be removed without damage when you move.
Freestanding organizers require no installation. Stackable containers, tiered racks, and drawer dividers simply sit inside your cabinets. When you move, you take them with you.
Over-the-door organizers hang on existing cabinet doors using tension rods or hooks that don't require drilling. These solutions maximize unused door space while remaining completely removable.
Command strips and adhesive hooks offer temporary hanging solutions. These damage-free hangers hold lightweight organizers and hooks without leaving marks when removed.
The Sinkelle CabinetFlow Hanging Organizer features tool-free installation specifically designed for renters and those avoiding permanent modifications. It hangs beneath existing cabinets using secure but non-damaging methods, creating additional storage without drilling. At $44.99, it's a renter-friendly solution that moves with you.
Stackable containers work exceptionally well for renters because they're completely portable. Clear containers let you see contents without opening them. When you move, you simply stack them and transport them to your new kitchen.
Document your original cabinet condition before organizing. Take photos of empty cabinets before installing any organizers. This protects your security deposit by proving you didn't damage anything.
Step 5: Optimize Vertical Space and Placement
Vertical space is your hidden storage opportunity. Most people organize horizontally, stacking items on shelves without using the full height available. Vertical organization doubles or triples your storage capacity without expanding your cabinet footprint.
Stackable containers and tiered organizers maximize vertical height. A single shelf becomes two usable levels when you add a riser. This vertical approach works especially well for lightweight items like plastic containers, small bowls, and pantry staples.
Adjustable shelves give you flexibility to create custom vertical arrangements. Items requiring significant height get dedicated space with appropriate clearance. Smaller items occupy compact spaces with minimal wasted vertical room.
Eye-level placement matters for accessibility and everyday workflow. Items you use daily should sit between shoulder and waist height. Frequently-used spices, cooking oils, and everyday dishes belong in this prime real estate. Occasional-use items can occupy higher or lower shelves.
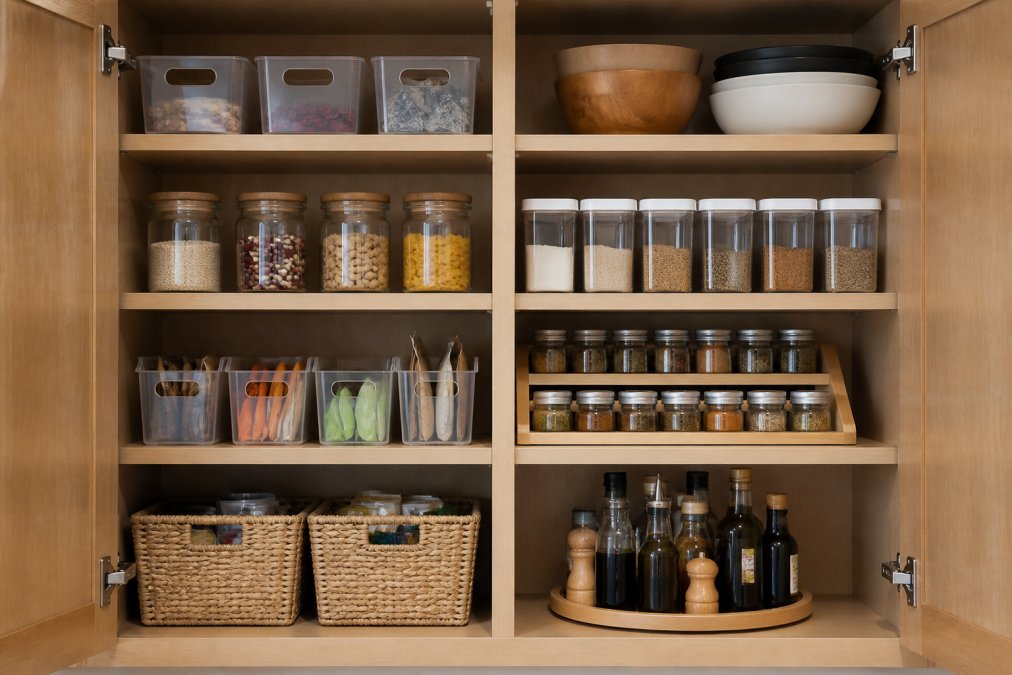
Consider ergonomics, especially if you're organizing for aging-in-place accessibility. Heavy items shouldn't require reaching above shoulder height or bending to knee level. Heavier cookware belongs at mid-level shelves where you can access it without strain.
The Sinkelle 2-Tier Pantry Storage Rack maximizes vertical space while maintaining accessibility. Made from premium bamboo, it creates two storage tiers in a compact footprint. At $71.99, it's an investment in vertical efficiency that transforms how you use cabinet space.
Group similar heights together. Tall items like cereal boxes occupy one section. Medium-height items like canned goods sit together. Small items cluster in their own zone. This height-based organization creates visual harmony while maximizing space efficiency.
Don't forget the backs of shelves. Shallow organizers or small containers can use this back space for items you access less frequently. Lazy Susans in back corners make deep items accessible without reaching to the very back.
Create a maintenance schedule to sustain your organization. Monthly, spend 10 minutes returning items to their designated zones. Quarterly, assess whether your current zones still match your cooking patterns. Annual deep organization prevents gradual deterioration of your system.
Organizing your kitchen cabinets step by step transforms daily cooking from frustrating to efficient. The process takes time upfront but pays dividends in reduced stress and faster meal preparation. Start with decluttering, measure carefully, create zones that match your workflow, and invest in quality organizers that suit your specific space.
SinkElle understands that kitchen organization isn't one-size-fits-all. Our minimalist Scandinavian-inspired solutions address the real challenges homeowners face: limited space, moisture concerns, and the need for tool-free installation. Get started with SinkElle's waterproof, elegant organizers and transform your kitchen into a beautifully organized space that makes cooking more efficient and inviting.
Frequently Asked Questions
Q: How do you decide where to put things in kitchen cabinets?
A: Organize by workflow and frequency of use. Store everyday items at eye level for easy access, place cookware and bakeware near cooking zones, and keep cleaning supplies under the sink. Group similar items together in defined zones to create an efficient system. Consider your kitchen triangle layout, the path between sink, stove, and refrigerator, and position items accordingly to reduce unnecessary movement during meal prep.
Q: What are the best tools for organizing kitchen cabinets?
A: Stackable bins, drawer dividers, shelf liners, and adjustable shelves are essential. The Sinkelle PanNest Adjustable Pot Organizer ($38.99) works well for cookware storage, while the Sinkelle CabinetFlow Hanging Organizer ($44.99) maximizes under-cabinet space. For under-sink areas, the Sinkelle 2 SlideNest Organizer ($55.99) provides flexible 2-tier storage. Lazy Susans help access items in deep corners, and labeled containers keep inventory clear and maintain the system long-term.
Q: How can I organize my kitchen cabinets without permanent modifications?
A: Use non-permanent solutions like adhesive shelf liners, tension rods, and hanging organizers that don't require drilling or wall anchors. The Sinkelle CabinetFlow Hanging Organizer hangs directly under existing cabinets without tools. Freestanding racks, stackable containers, and adjustable shelving units work within existing cabinet frames. These options are ideal for renters and those who want flexibility to reconfigure as needs change.
Q: What's the most efficient way to organize kitchen cabinets?
A: Follow a systematic approach: declutter first, measure dimensions, categorize by use, then install organizers. Place frequently used items at eye level, store cookware near cooking zones, and keep pantry staples accessible. Use vertical storage to maximize cabinet depth, implement a labeling system for easy identification, and schedule quarterly maintenance to prevent clutter from returning. This workflow-based method reduces decision time and keeps your kitchen running smoothly.
This article was written using GrandRanker