


Table of Contents
- Why Kitchen Sink Caddies Get Slimy in the First Place
- Step 1: Choose the Best Sink Caddy for Drainage
- Step 2: Set Up Your Caddy for Maximum Airflow and Water Drainage
- Step 3: How to Keep a Sponge Dry Between Uses
- Step 4: How to Clean a Kitchen Sink Caddy on a Regular Schedule
- How Often to Clean a Sponge Holder and When to Replace It
- Troubleshooting Persistent Odor, Discoloration, and Slime Buildup
- Frequently Asked Questions
Last Updated: October 18, 2026
Why Kitchen Sink Caddies Get Slimy in the First Place
Understanding how to keep kitchen sink caddies from getting slimy starts with knowing that slime forms when moisture, soap residue, and organic matter create the perfect environment for bacteria and mold to thrive.
The real culprit is standing water. When water pools beneath your caddy or inside it, bacteria colonize that damp space. Add a warm kitchen and you've got ideal breeding conditions.
Here's what most guides get wrong: they focus on cleaning the caddy after slime appears, when the real answer to how to keep kitchen sink caddies from getting slimy is prevention.
Step 1: Choose the Best Sink Caddy for Drainage
Not all caddies are created equal. The difference between one that stays clean and one that gets slimy comes down to drainage design.
Look for a caddy with these features:
- Open or slatted bottom that lets water pass through
- Elevated feet or legs that create space beneath for air circulation
- A drain spout or channel that directs water back into the sink
- Sloped surfaces that shed water instead of pooling it
The CDC guidance on kitchen sanitation emphasizes that proper drainage and airflow are critical for preventing bacterial growth in wet areas.
At SinkElle, we designed the FlowRack Pro Caddy specifically to solve this problem. It features a built-in spout that drains every drop straight back into the sink. No standing water.

Step 2: Set Up Your Caddy for Maximum Airflow and Water Drainage
Where you place your caddy matters as much as which one you choose.
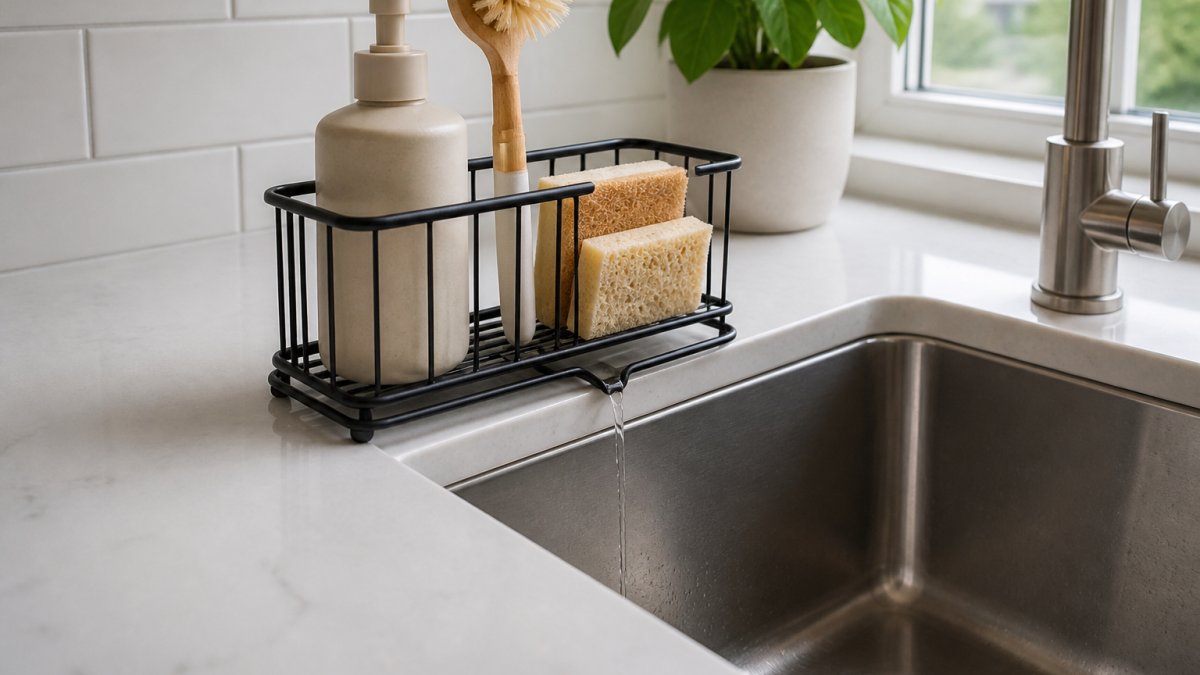
Make sure there's at least 2-3 inches of clearance around the caddy. Air needs to flow underneath and around it.
Angle matters too. If your counter slopes toward the sink, that's perfect. Water naturally flows toward the basin.
Check what's underneath your caddy daily. Even with good drainage, a few drops might accumulate beneath the feet. Wipe them away.
Step 3: How to Keep a Sponge Dry Between Uses
Your sponge is the main culprit. A wet sponge sitting in a caddy all day becomes a breeding ground for bacteria.
Squeeze your sponge hard after washing dishes. Get as much water out as possible. Then place it where air can reach all sides.
Here's what works:
- Use a caddy with an open design so air circulates around the sponge
- Hang the sponge on a hook or bar rather than laying it flat
- Position it away from other wet items so water from dishcloths doesn't drip onto it
- Rotate between two sponges so one dries completely while you use the other
The FlowRack Pro Caddy includes a towel bar specifically for hanging dishcloths.

Never store a damp sponge in an enclosed container or under a pile of other items. Air needs to reach it from all sides.
Step 4: How to Clean a Kitchen Sink Caddy on a Regular Schedule
Most guides tell you to "clean it regularly" and stop there. That's useless when slime is already forming. What actually works is a three-tier schedule, daily, weekly, monthly, with material-specific steps so you don't scratch a coated finish or pit stainless steel.
The daily 60-second reset
Do this every night after the last dish:
- Lift the caddy off the counter and dump any water that collected under the feet or suction cups.
- Wipe the counter spot with a dry cloth, not a wet one, which just moves the film around.
- Rinse the caddy tray under hot tap water and shake it out.
- Stand sponges on edge or hang them so air hits both faces.
This is the step that prevents 80% of slime. Slime needs a wet, undisturbed surface for roughly a day to become visible; breaking that film nightly keeps you ahead of it.
The weekly 5-minute clean (every 3-4 days in a busy kitchen)
- Clear everything off the caddy.
- Rinse under hot water, then scrub all surfaces with a soft brush or a non-scratch sponge, pay attention to the corners, the seam where the tray meets the frame, and the underside of any suction cups.
- Wash the caddy with dish soap and warm water, then rinse until the water runs clear (soap film is itself a food source for bacteria).
- Dry with a clean towel and let it air-dry fully before reloading.
The monthly deep clean, by material
This is where most advice falls apart, because stainless steel, plastic, silicone, and coated metal do not tolerate the same treatment.
| Material | Safe method | Avoid |
|---|---|---|
| Stainless steel | Hot water + dish soap; scrub with a soft brush; for water spots, a paste of baking soda and water; dry immediately to prevent spotting | Chlorine bleach left to sit (pitting), steel wool (scratches harbor bacteria) |
| Plastic | Hot water + dish soap; soak 15 minutes in a 1:1 white vinegar and water solution for odor; scrub crevices with an old toothbrush | Boiling water (warps), abrasive cleansers (cloud the surface) |
| Silicone | Hot water + dish soap; vinegar soak for odor; flexible silicone can usually go on the top rack of a dishwasher | Direct high heat or sharp scrubbing that tears the surface |
| Coated metal | Warm water + dish soap; soft cloth only; baking soda paste for stains | Bleach, abrasive pads, or soaking, all can chip or dull the coating |
Don't forget the drainage path
A caddy that drains well when new can clog silently. Once a month, run hot water through the drain holes or spout and check that it flows freely. If water backs up, soak the caddy in warm vinegar water for 20 minutes to dissolve soap and mineral film, then flush again. A clogged drain turns a good caddy into a bathtub.
A quick note on sanitizing sponges and dishcloths
Cleaning the caddy without cleaning what sits in it just recontaminates the surface. Most practitioners rotate two sponges so one dries fully while the other is in use, and replace sponges every 1-2 weeks. Dishcloths should go into the laundry every 1-2 days on a hot cycle. If you sanitize a sponge, do it after the caddy is clean and dry, never put a damp, just-sanitized sponge back into a damp caddy.
How Often to Clean a Sponge Holder and When to Replace It
How often you clean your caddy depends on how much you use it. A busy kitchen might need weekly cleaning. A lighter-use kitchen could go longer.
Replace your sponge every 1-2 weeks. Even with perfect drying conditions, sponges break down over time. Fibers deteriorate. Bacteria accumulate inside the material itself. A new sponge is cheap.
Watch for these signs it's time to replace:
- Visible discoloration or dark spots
- A sour smell that doesn't wash away
- Falling apart or crumbling when you squeeze it
- Stiff or crusty texture instead of squishy
If your caddy itself shows rust, cracks, or permanent discoloration, it's time for a new one. A damaged caddy can't drain properly and becomes a slime trap.
Troubleshooting Persistent Odor, Discoloration, and Slime Buildup
When slime keeps coming back, guessing wastes time. Use this symptom-to-cause table to find the actual source before you clean again.
| Symptom | Most likely cause | First fix | If it persists |
|---|---|---|---|
| Sour or musty smell from the caddy | Bacteria in trapped water under the caddy or in drain holes | Empty and dry the caddy nightly; flush drain holes with hot water | Soak 30 minutes in 1:1 white vinegar and water, scrub, air-dry fully |
| Smell comes from the sponge, not the caddy | Sponge stayed damp too long or is past its lifespan | Squeeze dry, stand on edge, rotate two sponges | Replace the sponge, odor inside the foam rarely washes out |
| Dark spots or streaks on the caddy | Mold or mineral deposits | Scrub with baking soda paste and a soft brush | Switch to a material-appropriate cleaner; check for scratches that trap residue |
| White chalky film | Hard-water minerals or soap scum | Vinegar soak, then rinse | Dry the caddy after every use; a squeegee or towel takes seconds |
| Slime returns within a week | Water still pooling somewhere | Check under feet and suction cups; verify drain spout is clear | The caddy design may be the problem, see below |
| Rust spots on "stainless" or coated metal | Finish damage or prolonged standing water | Dry immediately after each use | Replace the caddy; rust pits harbor bacteria |
Distinguish caddy problems from sponge problems
A quick test: clean and fully dry the caddy, then put in a brand-new sponge. If slime or odor returns within a few days, the caddy is the source, usually trapped water or a drain that isn't working. If the new sponge stays fresh but the old one went slimy fast, the sponge was the problem, and more frequent replacement is the fix.
When to replace rather than clean
Replace the caddy when you see any of these:
- Rust that returns after cleaning, or pitting on metal
- Cracks, chips, or peeling coating that trap water and residue
- A drain that stays clogged after a vinegar soak
- A persistent odor that survives a full deep clean and air-dry
Replace the sponge every 1-2 weeks, or sooner if it smells sour, crumbles, or stays stiff after soaking. A damaged caddy cannot drain properly no matter how often you clean it, so replacement is the real fix, not another round of scrubbing.
If you've worked through the table, replaced the sponge, and confirmed the drain is clear, and slime still returns within a week, the caddy's design is the limiting factor. A caddy with sealed edges or a flat, solid bottom will always hold water; upgrading to one with an open bottom, elevated feet, and a directed drain removes the root cause instead of treating the symptom.
Frequently Asked Questions
Why does my kitchen sink caddy get slimy so fast?
Slime forms when sponges, dishcloths, and scrubbers stay damp in your sink caddy. Standing water, poor airflow, and soap residue create the perfect environment for bacterial and mold growth. A caddy without proper drainage traps moisture around your cleaning tools, causing them to sit in puddles between uses. The FlowRack Pro Caddy solves this by draining water directly back into the sink, so your sponge actually dries instead of staying wet.
How often should I clean a sponge holder to prevent slime?
Clean your sink caddy twice weekly if you use it daily. Wipe it down with a damp cloth and dry it completely. Once a week, do a deeper clean by removing all items and scrubbing the caddy's interior and underside with a brush and mild soap. If you notice odor or visible slime starting to form, increase to three times per week. The key is catching moisture and residue before they accumulate into a slimy layer.
What's the best way to keep a sponge dry in a kitchen sink caddy?
Position your caddy where it gets air circulation, away from the wall or enclosed spaces. After using your sponge, squeeze out excess water completely and place it where water can drain away, not pool underneath. Hang your dishcloth on a separate bar or hook so it dries independently. A caddy with built-in drainage like the FlowRack Pro ensures water doesn't collect around your tools. Empty any water that collects in the caddy's base daily, and rotate sponges so they dry fully between uses.
Is a stainless steel caddy better than plastic for preventing slime?
Stainless steel resists bacterial growth better than plastic and dries faster, making it a stronger choice for preventing slime. However, the material matters less than drainage design. A plastic caddy with excellent drainage and ventilation will outperform a stainless steel caddy that traps water. Look for caddies with open designs, drain spouts, or elevated bases that allow air to flow underneath. The FlowRack Pro's coated steel frame with a built-in spout combines durability with the drainage design that actually stops slime from forming.
Keeping your kitchen sink caddy clean comes down to one principle: don't let water sit. A caddy designed for drainage, positioned for airflow, and cleaned on schedule will stay fresh and slime-free. The SinkElle FlowRack Pro Caddy is engineered with this exact goal in mind, featuring a built-in drain spout, elevated feet for airflow, and a towel bar for separating wet items. Get started with SinkElle and transform your sink area into an organized, hygienic space that actually stays clean.