


Table of Contents
- How to Declutter Your Kitchen Sink Cabinet Before Organizing
- Plan Around Your Plumbing Before Buying Any Storage
- Under Sink Storage Ideas for Small Kitchens That Actually Work
- Best Organizers for Under Kitchen Sink: What to Look For
- How to Organize a Small Kitchen Sink Countertop Area
- Safety, Sustainability, and Renter-Friendly Considerations
- Maintaining Your Organized Sink Area Long-Term
- Conclusion
Last Updated: August 6, 2026
How to Declutter Your Kitchen Sink Cabinet Before Organizing
The biggest mistake people make when organizing a small kitchen sink is skipping decluttering and buying storage products immediately. Before a single bin goes in, decluttering determines whether the system actually works. The answer is almost always that they organized clutter instead of eliminating it.
What to Toss, Donate, or Relocate
Pull everything out from under the sink and sort into three piles: toss, relocate, and keep.
Toss: Expired cleaning products, near-empty bottles you've been "saving," duplicate sponges past their prime, and anything untouched in three months.
Relocate: Items that don't belong under the kitchen sink, batteries, light bulbs, and random tools. Move them to more appropriate storage elsewhere. Products you reach for multiple times daily, like dish soap and hand soap, belong on the countertop within arm's reach.
Keep: Only cleaning supplies, dishwasher pods, trash bags, and sink-specific items you use regularly.
If you can't remember the last time you used it, it doesn't earn cabinet space. The goal is a curated set of essentials, not a backup stockroom.
| Category | Action | Reason |
|---|---|---|
| Expired products | Toss | Safety and space |
| Rarely used items | Relocate | Frees prime storage |
| Duplicate supplies | Toss or donate | Reduces clutter |
| Daily-use products | Move to countertop | Improves accessibility |
| Active cleaning supplies | Keep under sink | Core storage purpose |
Plan Around Your Plumbing Before Buying Any Storage
Most under-sink organization guides skip this entirely, which is a problem. The plumbing configuration under your sink determines what storage will actually fit. Buying organizers without accounting for it leads to returns and frustration.
Under-sink organization is the practice of systematically arranging cleaning supplies, trash bags, and household essentials within the cabinet space beneath your kitchen sink, working around existing plumbing infrastructure.
Mapping the P-Trap and Garbage Disposal Clearance
The P-trap is the curved pipe section directly below the drain that prevents sewer gases from entering your home. According to plumbing guidance from the International Association of Certified Home Inspectors, this component is non-negotiable and cannot be moved without a licensed plumber. It typically occupies the center-rear of the cabinet and extends several inches outward.
Before purchasing any storage system, measure these three dimensions: cabinet interior width at the narrowest point, usable height from the cabinet floor to the underside of the sink basin, and P-trap clearance including a few inches of buffer on each side.
If you have a garbage disposal, it mounts directly below the drain and takes up 8-12 inches vertically, effectively splitting your cabinet into two asymmetrical zones: a taller open side and a shorter disposal side. Plan your storage in two distinct zones rather than treating the cabinet as a single open space. Taller items like spray bottles belong on the open side; flat, low-profile organizers work best on the disposal side.
Under Sink Storage Ideas for Small Kitchens That Actually Work
The best under-sink storage ideas for small kitchens treat the plumbing as a fixed constraint and build around it. Generic advice to "add more shelves" fails the moment someone has a garbage disposal or an off-center P-trap.
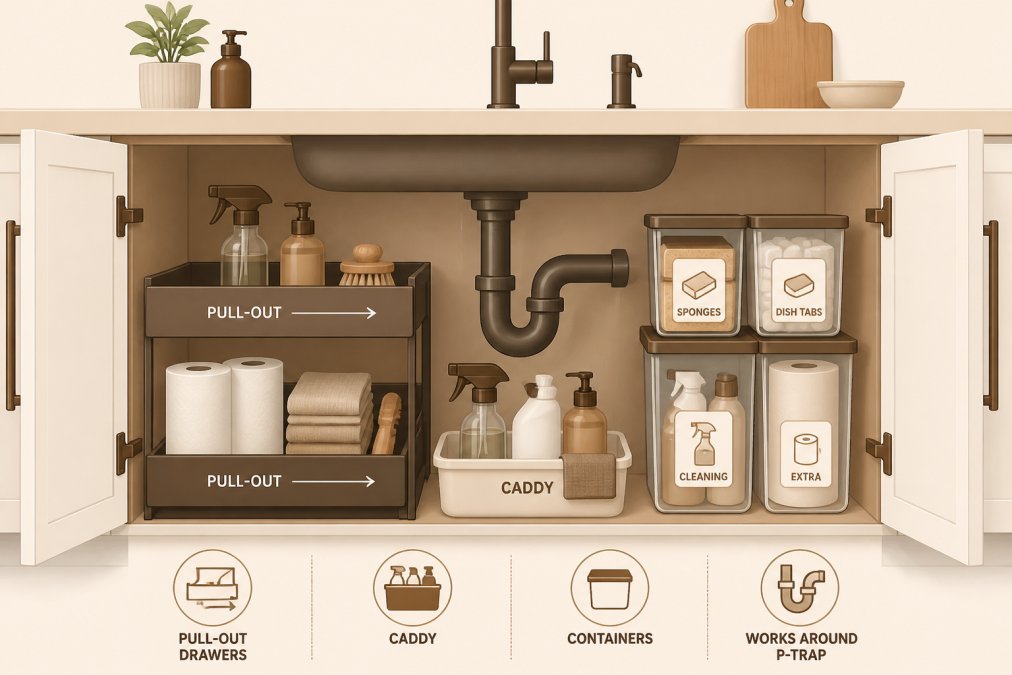
Divide the cabinet into functional zones: a cleaning supplies zone, a trash bag zone, and a miscellaneous zone for items like extra sponges or dish soap refills. Compartmentalization separates a system that stays organized from one that collapses within a month.
Pull-Out Drawers and Sliding Organizers
Pull-out drawers are the single most functional upgrade for under-sink storage in small kitchens. They solve the core problem: items pushed to the back of a deep cabinet become invisible and inaccessible.
A sliding organizer sits on the cabinet floor and rolls forward when you open the door, bringing everything within reach without requiring you to crouch and reach blindly into the back. Look for models with a cutout or notch in the back panel designed to fit around a P-trap, since a standard rectangular drawer will not fit in most cabinets. For cabinets with garbage disposals, a two-tier pull-out system works well on the open side, while a shallow single-tier slider handles the lower-clearance disposal side.
Risers, Pedestals, and Shelf Dividers
Vertical space is almost always wasted in under-sink cabinets. A riser or pedestal creates a second level above the cabinet floor, effectively doubling your usable storage without adding footprint. Place a riser on the open side to store spray bottles or tall containers on top, with flat items like sponge refills stacked underneath. Shelf dividers keep categories separated so the system doesn't collapse into a single pile.
Height matters more than width. Measure the vertical clearance before purchasing and leave at least two inches of buffer to avoid hitting the underside of the sink basin.
Using Vertical Space and Cabinet Door Storage
Cabinet door storage is one of the most underused solutions in small kitchen organization. Adhesive hooks and over-the-door organizers can hold spray bottle triggers, cleaning brushes, or a small trash bag dispenser, freeing up the cabinet floor for bulkier items.
Check your cabinet door's material and weight capacity before loading it. For renters or anyone cautious about adhesive damage, look for over-the-door hooks that hang from the cabinet frame rather than adhering to the surface.
Best Organizers for Under Kitchen Sink: What to Look For
Choosing the best organizers for under kitchen sink spaces comes down to four criteria.
Plumbing clearance: The organizer must physically fit around the P-trap and any garbage disposal. Look for adjustable or modular designs that can be configured around your specific plumbing layout.
Waterproof materials: Under-sink environments are humid by nature. Leaks happen, condensation builds up, and cleaning product spills are inevitable. Prioritize waterproof finishes that can be wiped clean without degrading.
Accessibility: The best storage system is the one you'll actually use. If retrieving a cleaning product requires moving four other items, the system will break down within weeks. Pull-out or sliding mechanisms solve this directly.
Visual uniformity: A cabinet full of mismatched bins in different colors and sizes creates visual noise that makes the space feel chaotic even when technically organized. Matching containers and consistent labeling create the sense of order that motivates maintenance.
SinkElle's approach to under-sink organization addresses all four criteria: the system is designed around real plumbing constraints, uses waterproof materials built for sink environments, and brings the Scandinavian-inspired aesthetic that makes maintaining the space genuinely satisfying rather than a chore.
How to Organize a Small Kitchen Sink Countertop Area
The countertop around a small kitchen sink is prime real estate. Every item that lives there should earn its place through daily use. The goal is to keep only what you reach for multiple times a day, and to make those items look intentional rather than incidental.
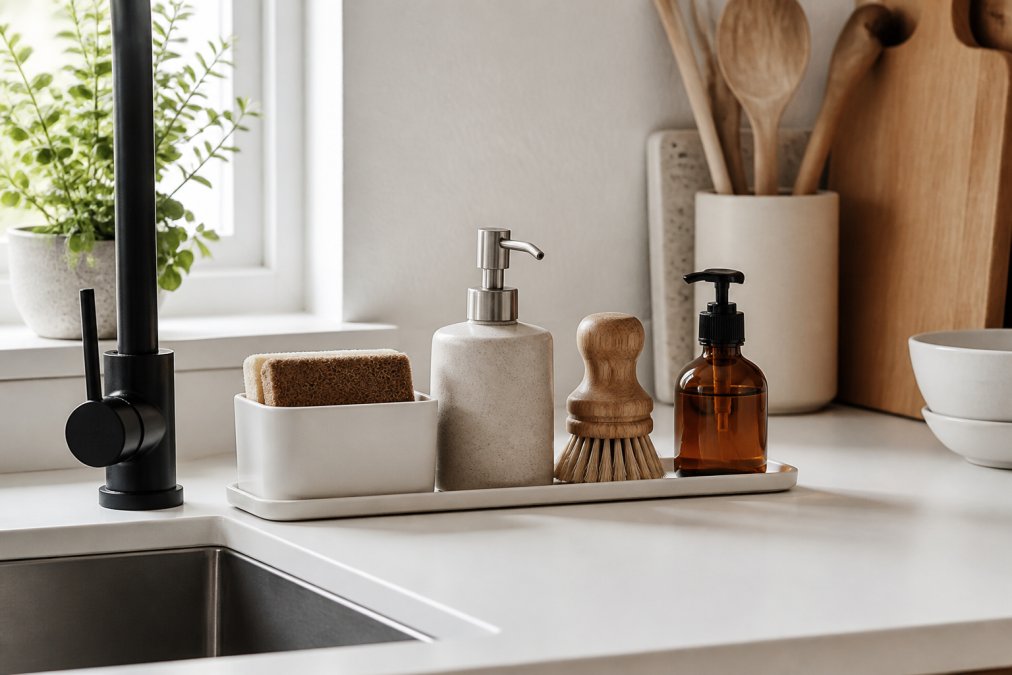
The most common countertop mistake is keeping too much out. A sponge, dish soap, hand soap, and a small brush are the genuine daily-use items for most households. Everything else can live under the sink until needed.
Decanting and Labeling for Visual Uniformity
Decanting is transferring products from their original packaging into uniform, aesthetically consistent containers. A countertop with matching dispensers looks composed and intentional, while mismatched plastic bottles look cluttered.
For dish soap and hand soap, a matched set of dispensers in a single material and finish creates immediate visual calm. Reusable containers also reduce plastic waste over time. Labeling prevents the "mystery bottle" problem where you have to open and smell containers to identify them.
According to the EPA's guidance on reducing household plastic waste, reusable dispensers and refillable containers are among the most practical steps households can take to reduce single-use plastic consumption.
Managing Sponges, Brushes, and Cleaning Caddies
A sponge left flat on the counter stays wet, grows bacteria, and looks unsightly. A sponge holder that allows air circulation on all sides solves both the hygiene problem and the aesthetic one. For brushes, a small caddy or holder keeps them upright and draining properly.
Safety, Sustainability, and Renter-Friendly Considerations
Safety under the kitchen sink is a topic most organization guides ignore entirely. Cleaning products stored under the sink should be in their original labeled containers or clearly labeled decanted containers. The U.S. Consumer Product Safety Commission's guidance on safe household chemical storage recommends keeping cleaning products in locked or child-resistant storage when young children are present. Cabinet door locks are inexpensive, easy to install, and fully removable.
For renters specifically: tool-free installation is essential. Drilling into cabinet walls or doors can constitute lease violations and result in deposit deductions. Look for organization systems that use tension rods, over-the-door hooks, or adhesive-free mounting. SinkElle's tool-free installation design means nothing gets drilled, screwed, or permanently attached, making the entire system renter-safe by design.
Sustainability considerations: Choose organizers made from durable materials that will last years, not months. Opt for reusable containers over single-use packaging wherever possible. When decluttering, donate usable products to local shelters or community organizations rather than discarding them.
DIY solutions like tension rods across the cabinet interior cost very little and work well for basic needs. Modular, purpose-designed systems cost more upfront but typically last longer, fit better, and require less ongoing adjustment.
Maintaining Your Organized Sink Area Long-Term
Organization systems fail when the maintenance required to sustain them is higher than people will actually do. Design the system so that putting things back is easier than setting them down randomly.
One in, one out: When you buy a new cleaning product, the old one gets used up or discarded before the new one goes under the sink. This prevents gradual accumulation that defeats every organization system.
Monthly resets: Once a month, pull everything out from under the sink, wipe down the cabinet floor, and put things back deliberately. This takes about ten minutes and prevents small disorder from compounding.
Labeling zones, not just containers: Mark which zone is for cleaning supplies, which is for trash bags, and which is for dish supplies. When zones are defined, items have a clear home, and the system becomes self-correcting.
Countertop discipline: Nothing lives on the counter that isn't used at least once a day. Everything else goes under the sink or into a drawer.
As noted in organizational psychology research from the American Psychological Association, environments that are visually ordered tend to reduce cognitive load and support consistent behavior. A kitchen sink area that looks good is genuinely easier to maintain than one that doesn't, because the visual feedback of an organized space reinforces the habits that keep it that way.
The goal of learning how to organize a small kitchen sink isn't a single afternoon project. It's building a system that's easy enough to maintain that it becomes the default state of your kitchen rather than a special occasion.
Keeping a small kitchen sink organized takes more than good intentions. The challenge is finding a system that fits your specific space, works around your plumbing, and looks good enough that you actually want to maintain it. SinkElle's waterproof, Scandinavian-inspired organization systems are designed for exactly this: tool-free installation, space-optimized layouts, and a minimal aesthetic that makes the sink area a genuinely pleasant part of your kitchen. Shop Now and see how the right system changes the way your kitchen feels every day.
Frequently Asked Questions
How do I maximize space under a small kitchen sink?
Start by mapping your plumbing. The P-trap and any garbage disposal unit take up significant room, so measure the usable clearance on each side before buying storage. Use pull-out drawers on one side and a tall caddy or risers on the other. Adhesive hooks on the cabinet door handle spray bottles or garbage bags. Compartmentalization, keeping cleaning supplies in one zone and dish soap refills in another, makes every inch count without creating chaos.
What are common mistakes to avoid when organizing under-sink storage?
The biggest mistake is buying organizers before measuring around the P-trap and any existing plumbing angles. Products that look right online often do not clear the pipes. A second common error is skipping waterproof materials, under-sink cabinets are exposed to drips and humidity, and non-waterproof organizers warp or grow mold within months. Finally, avoid over-filling the space. Keeping some open clearance makes it easier to spot leaks early, which protects both your cabinet and your home.
How do I keep my kitchen sink area clutter-free over time?
Set a simple weekly reset: return every item to its designated zone, discard empty bottles, and wipe down surfaces. Decanting dish soap and hand soap into uniform dispensers reduces visual noise and makes refilling automatic rather than an afterthought. Labeling containers, even with minimal adhesive labels, reinforces where things belong. The less decision-making required each day, the easier it is to maintain the system you set up.
Can I organize under my sink if I rent and cannot drill or make permanent changes?
Yes. Tension rods, adhesive hooks rated for the weight of your items, and freestanding pull-out organizers require no drilling and leave no permanent marks. Check that any adhesive product specifies it is removable and residue-free before applying it to cabinet walls. Freestanding risers and sliding drawer units rest on the cabinet floor without any attachment at all, making them fully temporary and landlord-safe while still giving you full storage functionality.
This article was written using GrandRanker