


Table of Contents
- Why Custom Pull-Out Kitchen Sink Organizers Beat Off-the-Shelf Bins
- Measure These Four Dimensions Before You Buy
- Choosing an Under-Sink Pull-Out Organizer That Clears Your Plumbing
- Anatomy of an Under-Sink Organizer for Plumbing Nightmares
- Under-Sink Organizer With Drawers: When Drawers Beat Open Shelves
- Waterproof Under-Sink Organizer Materials That Survive Leaks
- Custom vs. Off-the-Shelf: A Side-by-Side Comparison
- Sink-Area Organizers Worth Adding to Your Cabinet Setup
- Frequently Asked Questions
Last Updated: October 18, 2026
Why Custom Pull-Out Kitchen Sink Organizers Beat Off-the-Shelf Bins
Custom pull-out kitchen sink organizers are storage systems built to the exact dimensions of your cabinet, with slides and hardware chosen to clear your plumbing. They beat off-the-shelf bins because a bin you buy blind has to fit the worst-case cabinet, while a custom unit fits yours.
A damp, cluttered cabinet is exactly where mold gets a foothold.
The Real Cost of a Cheap Plastic Bin
A cheap bin costs little up front and a lot later. It warps, cracks at the corners, and traps water under the sponge. Many homeowners find they replace the same bin every year or two, which adds up faster than one properly specified unit.
What Custom Fit Actually Buys You
Custom fit buys three things: full use of the cabinet depth, slides that clear the pipes, and access without kneeling on the floor. A pull-out tray brings the back of the cabinet to you. That single change is why custom storage tends to stay organized while open shelves turn back into a pile.
Measure These Four Dimensions Before You Buy
Measure four dimensions before you buy: cabinet width, cabinet depth, cabinet height, and the distance from the cabinet floor to the lowest pipe or disposal housing. Write all four down in inches, then add two more checks that most guides skip: door clearance and slide extension. Guessing from a photo is a common mistake, and it can be the reason a tray that looked right online binds on the first pull.
A Step-by-Step Measurement Workflow
Work in this order so each number builds on the last:
- Clear the cabinet. Remove everything, including the shelf if it lifts out. You cannot measure to the back panel with bottles in the way.
- Measure interior width at three points, front, middle, and back, and record the narrowest. Cabinet boxes are rarely square, and a slide that fits the front edge can bind at the back.
- Measure interior depth from the back panel to the inside face of the door (not the outside face). This sets the maximum tray length before the door stops the pull.
- Measure interior height from the cabinet floor to the underside of the counter, then subtract the thickness of any slide hardware you plan to mount on the floor.
- Measure pipe clearance from the cabinet floor to the bottom of the P-trap, the disposal housing, and the U-bracket. Record the lowest point, not the average.
- Check door clearance. Open the door 90 degrees and measure the clear opening width. A pull-out tray must pass through that opening, so the tray width cannot exceed it.
- Confirm slide extension. A full-extension slide brings the tray completely out of the cabinet; a three-quarter extension leaves part of the tray inside. Measure the depth you need to reach and match it to the extension length.
Pipe Clearance and the U-Bracket Problem
The U-bracket, the metal strap that often hangs below the sink, is the obstruction that defeats most off-the-shelf bins.
A common pattern is a disposal housing that drops below the sink flange, leaving limited clear floor-to-pipe height at the back of the cabinet. That is why a single full-width tray can fail in some sink cabinets: it cannot pass under the disposal without hitting it.
| Measurement | Where to Take It | Why It Matters |
|---|---|---|
| Interior width | Narrowest point inside the box (front, middle, back) | Prevents slides from binding |
| Interior depth | Back panel to inside face of door | Sets usable tray length |
| Interior height | Cabinet floor to counter underside, minus slide thickness | Clears tall bottles |
| Pipe clearance | Floor to lowest pipe, disposal, or U-bracket | Stops the tray from hitting plumbing |
| Door clearance | Clear opening at 90 degrees | Tray must pass through the door |
| Slide extension | Full vs. three-quarter extension length | Determines reach to the back |
Choosing an Under-Sink Pull-Out Organizer That Clears Your Plumbing
Choose an under-sink pull-out organizer by working backward from the plumbing, not forward from the shelf. Sketch the pipe layout on paper, mark the clear floor space, and only then pick a tray shape. A single full-width tray fails in most sink cabinets.
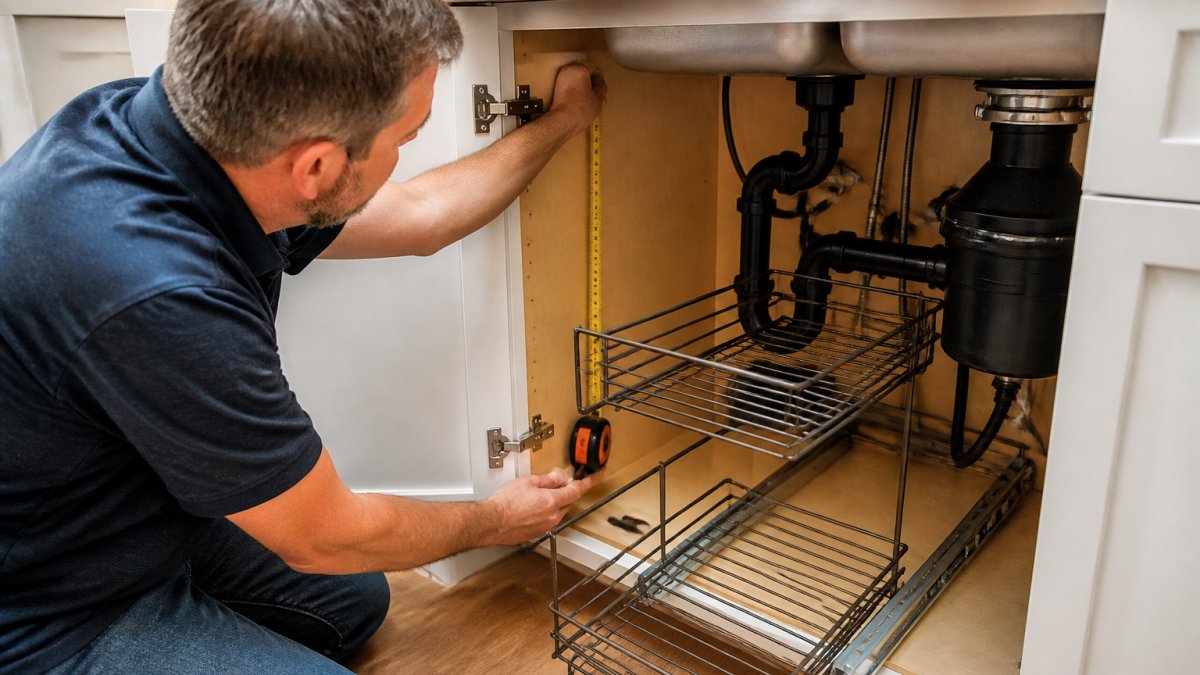
Split trays, side-mounted slides, and low-profile baskets each solve a different obstruction.
Anatomy of an Under-Sink Organizer for Plumbing Nightmares
An under-sink organizer for plumbing that fights back needs three parts: a cut-out or split deck, side-mounted slides rather than floor-mounted ones, and a front rail that keeps bottles upright. Side mounting is the fix most guides skip. It moves the hardware out of the disposal's path entirely.
A reversible design helps too. Left-side and right-side installation options let you route the slide away from the disposal and toward the open half of the cabinet.
Under-Sink Organizer With Drawers: When Drawers Beat Open Shelves
An under-sink organizer with drawers wins when you store small items: sponges, scrubbers, dishwasher pods, and cleaning cloths. Drawers keep those items contained and pull them into the light. Open shelves win for tall bottles and bulk cleaning supplies.
The trade-off is clearance. A drawer stack needs vertical room to open, so it suits cabinets without a low P-trap. For a tight cabinet with awkward plumbing, a single pull-out tray or a two-tier organizer usually fits better than a drawer bank.
Waterproof Under-Sink Organizer Materials That Survive Leaks
A waterproof under-sink organizer should be chosen for corrosion resistance and load performance first, not for the word "waterproof" on the box. Under a sink, the real enemy is standing moisture and the occasional slow drip, not a flood. The material decides how the unit ages; the slide hardware decides whether it still pulls smoothly after a year of heavy bottles.
Stainless Steel vs. Coated Steel vs. Plastic
Stainless steel resists rust and holds its shape under load, which is why it is the default for wet cabinets and heavy bottles.
Sinkelle HookNest Kitchen Sponge Holder →
| Material | Corrosion Resistance | Typical Load Capacity | Best For |
|---|---|---|---|
| Stainless steel | High | High (often 50-100 lb per tray) | Wet cabinets, heavy bottles |
| Coated steel | Medium | Medium (often 25-50 lb per tray) | Dry cabinets, light loads |
| Plastic (ABS) | High | Low to medium (often 15-30 lb per tray) | Small items, budget builds |
| Solid wood or plywood | Low unless sealed | Medium | Dry cabinets with a sealed finish |
Load capacity is set by the slide, not the shelf. A soft-close slide rated for the loaded weight keeps a full tray from sagging. A cheap slide on a heavy tray is a common failure point in under-cabinet storage.
Finish, Corrosion, and Hardware Performance
Corrosion starts at cut edges, screw holes, and welds, the places a finish is thinnest. On coated steel, inspect the cut ends before installation; bare metal there is where rust begins and where a slide eventually jams.
Hardware performance matters as much as the tray material. For the countertop side of the sink, [SinkElle's HookNest Kitchen Sponge Holder](https://sinkelle.com/products/sinkelle-hooknest-kitchen-sponge-holder) uses ABS for exactly this reason: it will not rust, and it holds sponges, scrubbers, and a dish cloth in one spot for $29.99.

Custom vs. Off-the-Shelf: A Side-by-Side Comparison
Custom and off-the-shelf organizers differ mainly in fit, cost, and installation effort. Off-the-shelf is cheaper and immediate. Custom costs more and takes planning, but it uses the full cabinet and clears the plumbing.
| Factor | Custom Pull-Out | Off-the-Shelf Bin |
|---|---|---|
| Fit | Built to your dimensions | One size, best guess |
| Plumbing clearance | Planned around pipes | Often blocked |
| Installation | Slides and brackets, some DIY | Drop in, no tools |
| Cost | Higher up front | Lower up front |
| Access | Full pull-out | Reach-in |
| Best for | Awkward plumbing, deep cabinets | Simple, shallow cabinets |
On load capacity and stability, the deciding factor is the slide, not the shelf. Soft-close slides rated for the loaded weight keep a full tray from sagging. A cheap slide on a heavy tray is the most common failure point we see in under-cabinet storage.
Sink-Area Organizers Worth Adding to Your Cabinet Setup
The cabinet is only half the job.
[SinkElle's FlowRack Pro Caddy](https://sinkelle.com/products/sinkelle-flowrack-pro-caddy-sink-organizer) has a built-in spout that drains water straight back into the sink, so the sponge actually dries between uses.

For dishes and produce, the ExtendDry Retractable Sink Rack adjusts across different sink sizes and drains through an open stainless steel frame.

To stop splashes at the source, the AquaShield Faucet Guard and the DryFlow Splash Mat channel drips back into the basin instead of across the counter.
A quick checklist before you order anything:
- Measure width, depth, height, and pipe clearance in inches
- Photograph the cabinet with a ruler against the back wall
- Confirm slide type: side-mounted for tight plumbing
- Confirm material matches your moisture level
- Check the return window before you buy
Frequently Asked Questions
What should I measure before buying a pull-out under-sink organizer?
Measure four things: the interior cabinet width at its narrowest point, the interior depth from the door frame to the back wall, the interior height from the cabinet floor to the underside of the sink basin, and the clearance around your pipes and garbage disposal. Note where the P-trap and supply lines sit, since a pull-out tray needs a clear path to slide out. Add half an inch of buffer to every measurement so the organizer does not bind against hinges or door frames.
Are custom under-sink organizers worth the cost?
They are worth it when standard bins waste most of your cabinet. A custom-fit pull-out typically costs more than a plastic bin, but it uses the full footprint around your plumbing instead of leaving dead corners empty. If your cabinet is narrow, has a disposal, or has awkward pipe angles, a fitted organizer recovers storage you cannot otherwise reach. In a standard wide cabinet with clean plumbing, a cheaper bin may be enough.
How do I choose a pull-out organizer that fits around plumbing?
Look for organizers with a U-bracket or split-frame design that leaves a gap for the P-trap and disposal. Measure the horizontal distance between your supply lines and the cabinet wall, then confirm the organizer's frame fits inside that gap. Two-tier and reversible designs help because you can flip the unit so the cutout faces the pipes. Avoid solid one-piece trays in cabinets with a centered disposal.
Are tool-free under-sink organizers sturdy enough for everyday use?
Suction-cup and tension-based mounts handle light daily loads well, such as sponges, brushes, and dish cloths. For heavier items like bottles of cleaning supplies, choose a unit with a rigid steel frame and soft-close slides rated for the weight. Tool-free installation matters most in rentals, where drilling is not an option. Check the load rating before you fill a pull-out tray with liquid-filled bottles.
What materials work best for a waterproof under-sink organizer?
Stainless steel and powder-coated carbon steel resist rust and hold up to occasional drips. ABS plastic is waterproof and light but can crack under heavy loads. Silicone works well for mats and splash guards because it flexes and dries fast. Avoid unfinished particleboard or plain wire racks, which rust or swell when exposed to moisture. Whatever you choose, wipe up standing water and check under the sink for slow leaks monthly.
The hard part of under-sink storage is not buying a shelf. It is the measuring, the pipe clearance, and the material choice that decide whether the unit still works in a year. SinkElle builds minimalist, Scandinavian-inspired sink-area organizers with waterproof materials and tool-free installation, so the countertop side of your setup stays dry and uncluttered while you sort out the cabinet. Get started with SinkElle and turn the space under your sink into storage you actually use.